Toybox 3D Printer User Guide

Toybox 3D Printer User Guide

to save your progress

Objectives:

  1. Learners will be able to set up a Toybox printer
  2. Learners will be able to use a 3D printer safely
  3. Learners will be able to navigate the Toybox app and website to find and design 3D models

Introduction

If you’re getting started with 3D printing, you’ve probably already imagined all sorts of things you could make: figurines, jewelry, ornaments, gifts, tools, and more. There are countless designs available online for you to explore, and when you start creating your own, the possibilities are almost endless. But before you can check out all 3D printing has to offer, you need to learn the basics. The Toybox printer is a fantastic place to start.

It’s an excellent machine for kids, newcomers, and anyone looking for an easy 3D printing experience. It’s designed for quick set-up and safe, easy printing. This lesson will walk you through the materials you’ll need, how to navigate the Toybox app and website, and how to use the printer.

What You'll Need

With internet access and a smart device, it's easy to get the rest of the materials you'll need to get the Toybox printer up and running. Review the list below to learn about the items required to start printing.

  • Toybox Printer: This is your key to countless hours of 3D printing fun. Make sure you’ve removed all packing material before plugging it in and setting it up.
  • Website/App: The Toybox needs to connect to a smart device for you to choose or design models and start printing.
  • Toybox Account: Whether you’re using the app or the website, you’ll need a Toybox account.
  • Files: Just like a regular printer needs instructions on how pages should look, 3D printers need instructions on how models should look. The instructions come in files, which you can find on the Toybox site or app. You can also use files from other sites and apps that come in the following formats: STL, OBJ, 3mf, and gCode.
  • Safe Filament: Everything you create on Toybox is made of filament. The company sells its own filament called Printer Food. You should know that despite the name, the filament SHOULD NOT BE EATEN. You can also use other brands of filament as long as they are 1.75mm thick and made of Polylactic Acid (PLA). Toybox printers were designed to use PLA filament because it’s non-toxic and biodegradable, so it’s a safe material and a great fit for new users and children.

Safety, Set Up, and Upkeep

The Toybox is quick to set up and easy to maintain, but before you start, you’ll need to review the safety guidelines. It is also strongly recommended that you share these rules for safe use with anyone who will be around the Toybox when it is in use, especially children.

Safety Guidelines

Anyone using the Toybox (or anyone who will be around while it is used) should watch the video below to learn the basic safety rules for operating the machine.

That video does a great job covering some of the most important rules, but if you want to be as safe as possible, we’ve prepared a full list of safety rules and a printout that you can keep near the Toybox at all times (see below). These rules can help keep you, those around you, and your printer safe.

Toybox Safety Rules

Set-Up Instructions

Once you’ve learned and shared the safety guidelines with those around you, you’re ready to set up your printer, and you might be surprised how quickly your printer will be ready to go. Just complete the following steps:

  1. The first thing you’ll need to do is make a Toybox account. Download and open the Toybox app or go to make.toys/toys and click Sign In and Create Account. You’ll need to provide an email address, username, and password. Toybox will send an email to the address you provide. Open this email and follow the instructions to confirm your account.
  2. Once your account is ready, go to make.toys/welcome. Sign in and click Set Up My Toybox. Follow the instructions and video examples on the screen. As you’ll see in the video below, this entire process can be completed in less than five minutes. Watch the video for a walkthrough of the whole process in real time.
  3. Follow the instructions in the video below to set up your printer's WiFi and link your account.

Your Toybox should be ready to print as soon as you’ve finished following the set-up instructions, but if you want to make sure that your first few models will come out just the way you hoped, you can run a quick test to make sure your printer is in the best possible condition. If you’re using a computer, go to make.toys/toys, click My Toybox, and then scroll down to Calibrate Your Toybox. If you’re using the app, go to My Toybox, click the three dots at the top-right corner of the screen, and then click Calibrate Your Toybox. Watch the video below, then follow the instructions on your screen.

Caring for Your Toybox

Like any technology, the better you take care of your Toybox, the longer it will last. The instructions below will help you keep your printer clean and in good working order.

  • Cleaning the Extruder: The extruder is the part of your printer that heats the filament and shapes your model. It’s marked with a sticker that says, "Hot Nozzle, Do Not Touch."Sometimes, the filament will build up in the extruder, clogging your printer. Follow the instructions in the video below to safely remove the filament.
We strongly recommend that only adults clean a clogged extruder on a Toybox.
  • Cleaning the Print Bed: When you print a model, some melted filament will probably be left behind on the magnetic printing pad. Usually, you can remove what’s left by bending the pad until the leftover material pulls free. You can also gently scrape the pad with a flat, rounded surface like a spoon. You’ll need to be careful. Scraping too hard can damage the print pad, which will cause problems printing in the future. 

If your pad has spots that can’t be removed in either of these ways, you can cover the top of the pad with blue painter’s tape for a smoother, cleaner surface. Replace the tape after every forty to fifty prints for best results.

  • Other Problems: Contact Toybox for assistance if you have other problems with your printer, particularly those related to liquid spills, overheating, or power issues. It is unsafe to try to fix these types of issues yourself.

Start Printing

When your machine is clean and safely set up, you’re ready to print. The simplest way to start is with one of the free designs available on the Toybox app and website: Read the steps below for instructions on choosing and printing any of these 3D models.

Printing Instructions

  1. Load a roll of filament onto the wheel at the back of the Toybox. The flat side of the roll should face the printer.
  2. Plug in the printer.
  3. Touch the top right corner of the touchscreen and then the square that says Food. Wait for the machine to warm up.
  4. Put the strand of filament in the hole at the top of the black box in the printer, then press Insert and push the filament downward (you may need to do this two or three times for the printer to take hold.)
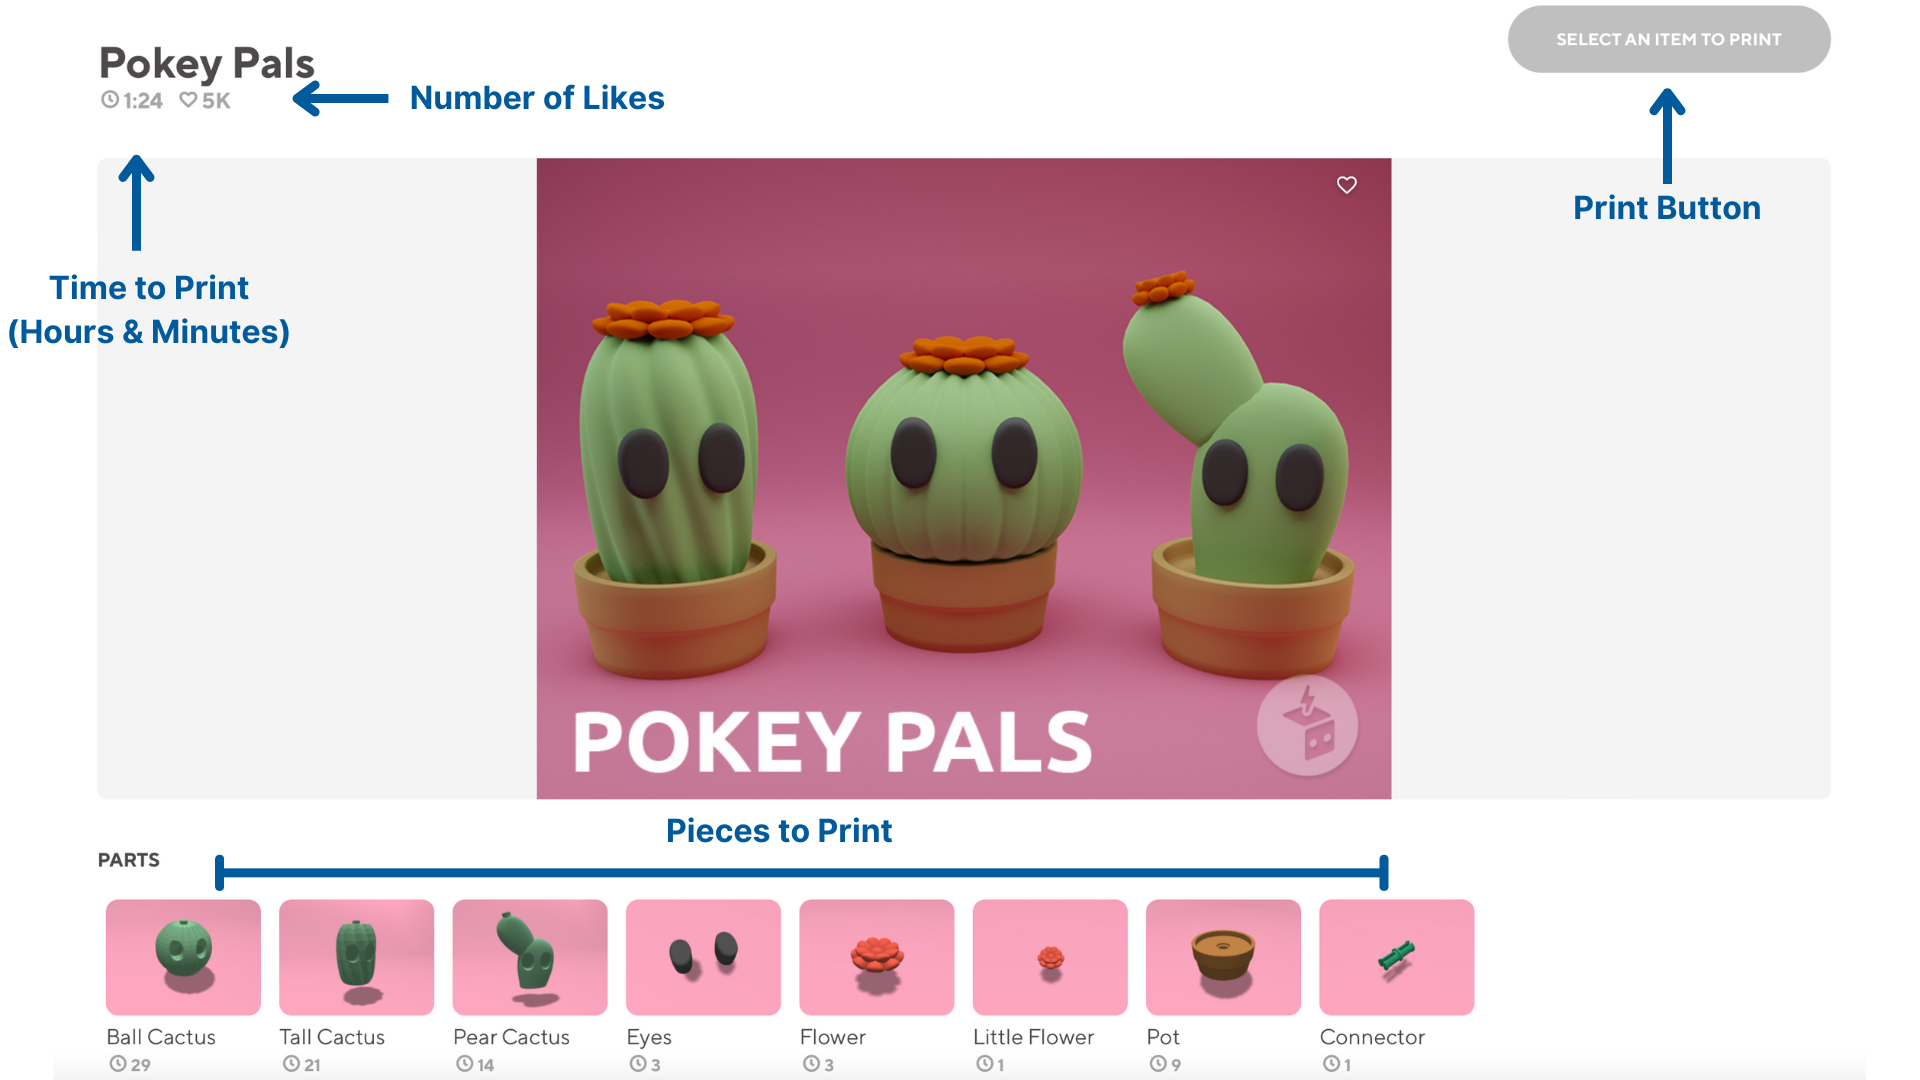
  5. Log into the Toybox app or make.toys/profile website. Click Explore to see the designs available on Toybox. Click on a design to open its page (see the example below). Here, you can see how long the model will take to print, how many other users have saved it, and the number of pieces it creates before starting. Choose a design, then click Print Me.
  6. Wait for the Toybox to finish printing, then give the model one minute to cool.
  7. Put one thumb on either side of the print plate and gently press downwards. Remove the magnetic print plate and bend it to remove your model from the pad.

And just like that, you’ve finished 3D printing your model! There are hundreds of designs ready and waiting for you, and more are added all the time. Browse through the Explore tab and click the heart icon to save your favorites for later.

Toybox Print Page

Stopping a Print

Now you know how to print, but sometimes a print will go wrong. And because some objects will take hours to make and use lots of filament, it’s best to stop early and start over when there’s a problem.

You should stop printing if…

  1. the layers are peeling apart from one another.
  2. the layers are uneven, collapsing on themselves.
  3. the first layer seems to be off/the wrong shape.
  4. a blob of filament is stuck on the print plate.
  5. a blob of filament is stuck on the nozzle (the metal tip).

Once you stop your print follow these steps.

  1. Wait one minute.
  2. Put one thumb on either side of the print plate and gently push down to move the model away from the nozzle.
  3. Gently pull the magnetic print plate off of the printer.
  4. Bend the plate to remove everything attached.
  5. Put the plate back on the printer.
  6. Click Reprint. Watch the printer to make sure the printing issue has stopped. If the printer is working correctly, you can stop here. If you are still having trouble, move on to the next step.
  7. Check the nozzle. If it is covered in melted filament, carefully clean the extruder. If it is NOT covered in melted filament, move onto the next step.
  8. Open your Toybox app or go to make.toys/toys. Click the My Toybox page. Then click Calibrate your Toybox and follow the instructions.
  9. If you have completed all these steps and are still noticing problems, search for your issue on the Toybox Troubleshooting page and follow the suggested steps.

More to Explore

Toybox has many designs ready to print, but that’s just the beginning. With the right files, you can print designs from all over the internet or create your own, which means countless options to play, decorate, and learn.

Finding Files

If you can’t find the designs you’re looking for on the Toybox app or site, you can also use other popular 3D printing sites like Thingiverse, MyMiniFactory, and YouMagine. Unlike make.toys, these sites were not designed with the Toybox in mind, so we recommend providing adult supervision for children using these sites.

When you find a design you want to print, you can download the necessary files onto your device. Your Toybox can print 3D designs saved as STL, OBJ, 3mf, and gCode files, which are common on the sites mentioned above. You can tell what type of file you have by looking at the file’s name. You’ll see a dot followed by the file type, for example, “wheel.gcode”.

To print one of these files, open the Toybox app or site and go to the Create page. Choose Import and select the file you want to print. Keep in mind that some files were designed for much bigger printers, so you may have to change the size of your model. To do this, go to the Scale option. A cube will appear on your screen. Click and drag the cube to make the design bigger or smaller. When the design fits, click Create and Print Me to create your model.

Designing Models

When you’re ready to start creating your own designs, you’ll have several options to choose from. Most of these can be found under the Create page. Each design option is described below. After reading through the descriptions, watch the video to see how to use each option.

On the Create page:

  • The Block Buddy and Build a Car options let you mix different pieces together to print human “buddy” models or vehicles. You can pick and choose shapes, accessories, and colors to quickly put together your own models.
  • The Draw option lets you sketch your own flat designs. Click Choose a Background to put your picture on base shapes, which can be used for keychains or simple jewelry.
  • The Picture option lets you choose pictures that Toybox redesigns as a 3D model. Simple images work better than detailed ones, but you can experiment with all kinds to see what works best for you.

If you’re looking for more ways to design, TinkerCAD lets you build 3D models for free when you create an account. The site has a huge collection of models, shapes, buildings, animals, and more, so it’s an excellent place for more experienced designers to see what they can make. When a design is finished, you can click Export to download your file and Import the file on Toybox to create your model. If you want to learn more about TinkerCAD, watch the video and explore the link below.

Educational Uses

3D printing can be a lot of fun, but it can also be a powerful tool for hands-on learning. It can help learners of all ages better imagine and interact with new concepts. Here are two ways you can use 3D printing to help you learn or teach something new.

Representing Ideas: Sometimes, words or pictures on a page aren’t enough to understand an idea. 3D models make it easier to see how ideas connect and relate to one another. Educators use objects like these, sometimes called “manipulatives,” to give learners hands-on classroom experiences. Consider the following examples.

  • Moving Objects: From spinning gears to planets in orbit, it’s easier to understand how objects push, pull, and crash into one another when they are right in front of you. Models make learners part of the experience.
  • Math: Objects can help learners count, understand how fractions and shapes fit together, and test probability with spinners and dice.
  • Limited Resources: Models representing money, fuel, land, and items for trade let learners visualize and imagine how resources are divided and saved in the real world.

Solving Problems: 3D printers also allow learners to face challenges and test solutions. A great way to start this process is to ask someone to think about a small problem they face every day and then design a model that could help. For example, people who forget their lunch boxes at home might find that it’s easier to remember if they hang the lunchbox somewhere they always see it using a 3D printed hook. Many great inventions started as simple ideas to improve daily life, and 3D printers let learners test ideas and think deeply about everyday problems.

This printer may be called a “Toybox,” but it can offer much more than toys. 3D printing lets people of all ages explore technology, practice creativity, and expand their learning. And don’t forget to share what you discover and design with others so that more people can experience what this technology has to offer.

to save your progress