Getting Started with MIDI and Mixing

Getting Started with MIDI and Mixing

to save your progress

Objectives:

  1. Learners will be able to use a MIDI instrument
  2. Learners will be able to mix and layer MIDI tracks
  3. Learners will be able to understand the purpose of chord progressions

There are many ways to make music, but MIDI offers some truly unique possibilities. Beginners can use MIDI instruments and track mixing as a welcoming introduction to the creative process, and users of all kinds can enjoy the freedom to experiment with and shape sounds to their liking.

This course will introduce the concepts of MIDI and mixing, teach you how to use MIDI devices, and walk you through music mixing and layering in GarageBand.

Terms for Beginners

Before you break out your instrument and start playing, it's important to know what MIDI is, what it can do, and what making music looks like with MIDI instruments. Watch the video below for a quick introduction, then continue reading for more information.

What is MIDI?

MIDI lets instruments communicate with each other and computers using MIDI data. This data tells a device's software how to imitate the sounds of instruments in ‘MIDI messages.' In this course, we will focus on instruments communicating with computers. When you connect a MIDI instrument to your computer, it sends a message whenever you start or end a note (these are called the “Note On” and “Note Off” commands). That message also records how hard the note was played (measured in ”velocity”). But the really exciting thing about MIDI is that you can change every part of that data. With MIDI-enabled software, you can control the following options:

  • What note is being played.
  • Where a note begins and stops.
  • How hard a note is played.
  • What instrument each note should sound like.

You have so many editing options that you can play a single note on a keyboard and copy and rearrange it over and over until you have a complete track or song.

But MIDI data can’t create those sounds alone; it needs something to read the data’s instructions and turn them into music. Many musicians use a computer or tablet connected to a MIDI instrument by a USB cable and a Digital Audio Workstation (DAW) app. In this course, we will be using a DAW called GarageBand.

How is MIDI Different from Digital Audio?

Not all sound data is MIDI. MIDI is a set of instructions that devices can use to mimic the notes and sounds of real instruments. That’s why you can play one note on a MIDI instrument and change it completely: you didn’t record the sound of a note. You recorded information about what you did on an instrument and have the freedom to change it afterward. Digital audio is a recording of sounds that real instruments make. Every device that receives digital audio tries to recreate some version of an original sound. That recording is still a type of sound data, and just like MIDI, it needs a device to read the data to play it out loud.

Review the graphic below to see how digital audio and MIDI process sound information differently.

Digital Audio vs MIDI Diagram

MIDI and digital audio are both great ways to record music, but MIDI messages are designed with more editing options, like the ones you learned about above. Whichever format you choose, though, you’ll be working with tracks.

What is a Track?

When it comes to mixing, a track is sound information, whether MIDI or digital audio. Often, tracks will be separated by the type of sound they create. A song might have a vocal track, a guitar track, a bass track, and a drum track; when all of those tracks are played together, the song is complete. MIDI tracks are far more customizable than audio tracks, allowing musicians to adjust a track until it is exactly the way they want it. While audio tracks can also be edited, there are more limits to how much a track can be changed.

  • Pre-Recorded Loops Most MIDI instruments and software come with a collection of ready-made tracks that you can use. These tracks make it easy to practice editing, mixing, and layering.

What is Mixing?

Mixing is the process of combining and modifying tracks to create a single product. This usually involves making adjustments to each track and arranging (layering) them in the tracks area before playing them all together. Since MIDI instruments make it easy to create many different kinds of tracks, mixing is a great skill for a MIDI musician to practice.

Using MIDI Equipment

As you’ve already learned, MIDI instruments open up lots of possibilities for musicians to create music. Let’s take a closer look at some common MIDI instruments used by beginners and review some strategies to keep that equipment in good working order.

Common Equipment

No matter what MIDI instrument you use, you’ll need a device to read and play the MIDI messages. You can get started with a simple computer or tablet and a USB connector cable for most instruments. Follow the instructions below to connect your instrument.

  1. Check to make sure your instrument is supported by the DAW you're using. You can usually find this information in the user guide or on the product's web page.
  2. Connect a cable to your instrument. If available, use a "MIDI OUT" or "To Device" port. Then, turn on your instrument.
  3. Connect the other end of your cable to your computer or tablet. Then, open the DAW.
  4. Create a new song or add a track and select an instrument option. Touch a button, pad, or key on your MIDI instrument. You should see the input playing on the DAW. Check your instrument's troubleshooting guide if you are experiencing problems.

Review the information below to learn more about some of the MIDI instruments frequently used by beginners.

Keyboard: MIDI keyboards are a great starting point for MIDI musicians. The layout of the keys feels natural and makes it easy for newcomers who spend a lot of time typing to experiment. And as you’ll see when we discuss MIDI editing, the process is much easier on a keyboard than on a screen. MIDI keyboards also vary in size, from small (25 keys) to full-size (88 keys), so no matter what space you’re working in, you’ll likely be able to find a keyboard that works for you.

Drum/Percussion Pad: Drum pad controllers offer a great way to experiment with recording different beats. Most drum pads come with pre-recorded loops, while percussion pads will usually only imitate the sound of various percussion instruments. Both types of controllers can be designed to use drum sticks (to recreate the feeling of a drum kit) or tap out beats with your fingers, so they can be even more portable than a small-scale keyboard.

MIDI Controller: MIDI controllers are any piece of equipment or software that can create MIDI messages, which means that MIDI keyboards and drum pads are also controllers. There are other kinds of controllers that use panels or sliders instead of keys or pads to create music. These controllers are quite popular and offer a different way to play with sound.

Your Device as a MIDI Controller: If you’re interested in making music with MIDI but aren’t prepared to buy a keyboard or dedicated controller, you may be able to use your smart device. Many Digital Audio Workstation (DAW) apps have built-in MIDI capabilities compatible with phones, tablets, and computers. You can select a software instrument and use your keyboard, mouse, or screen as though you were working with a piano, drum pad, or stringed instrument.

Caring for Equipment

MIDI instruments don’t require all the care that acoustic instruments do, but you need to take sensible precautions to keep them working at their best. Those precautions include

  • Regularly and carefully cleaning your instruments.
  • Setting up a safe play space free of tripping hazards or obstructions.
  • Playing with proper form.

Read the PDFs linked below for more information on how to care for your instrument.

The Right App for the Job: GarageBand

You can record and edit MIDI on any DAW, but Apple’s GarageBand is an excellent place for beginners to start. It can automatically recognize your MIDI instruments when connected to your device, has a wide range of virtual MIDI instruments and pre-recorded tracks to explore, and makes it easy to edit MIDI messages.

You can create MIDI tracks by following the instructions below.

  1. Connect your instrument to an Apple device.
  2. Open GarageBand.
  3. Click Create Song and choose an instrument.
  4. Check that GarageBand is reacting to your MIDI instrument by testing a few buttons, keys, or pads.
  5. Once GarageBand registers the input from your instrument, hit the red button to start recording. Hit the button again to end your track. 

To start editing, click a MIDI track and select Edit. This will open the MIDI piano roll. The keys on the left side of the screen represent notes, while the numbered rows on the right side of the screen represent time within the track. To add a note, slide the pencil icon in the top-left corner of the screen to the right, then click on the roll to create a note. To delete a note, click it again. Click and drag the left side of a note to move it around the piano roll. Moving up or down will change the sound; moving left or right will change when that sound is heard in the track. Click and drag the right side of a note to change how long it lasts. Click a note and select Velocity to change how “hard” the note is hit. A low velocity will have a soft tone, while a high velocity will have a stronger tone.

GarageBand also makes it easy to see the difference between MIDI and digital audio tracks. MIDI tracks are highlighted green in the tracks area, while digital audio tracks are highlighted blue.

Review the slideshow below to see the piano roll in action.

If you’re ever feeling lost in GarageBand, click the ? button. This will pull up helpful labels around the screen, including more instrument information.

Mixing and Layering Tracks

Once you’ve practiced using your instrument, you’ll be ready to start putting the pieces together. To do so, you’ll need to learn about the tracks area, controlling tracks, and how tracks can come together to form music.

The Tracks Area

Mixing and layering take place in the tracks area. You can click + or drag a track from the loops menu to add it to the tracks area. Once a track has been added, you’ll be able to hear it when you press play.

The Playhead: The playhead is the arrow-shaped icon connected to a vertical line at the top of the tracks area. The playhead shows what part of the track is currently being played. If you right-click or double-tap a track and select Split, it will split the track at the location of the playhead.

Pitched vs. Unpitched Tracks: Let’s look at two types of tracks you’ll find in most songs, pitched and unpitched tracks.

  • Pitched Tracks: These are tracks whose sound contains pitch, which is the quality of sound we describe as high, like a shrill whistle, or low, like thunder. Another way to think of pitch is anything that can be sung, like the scales “Do, Re, Mi,” has pitch. Many instruments can change the pitch of a note. Piano keys, for example, produce deeper pitches the farther left they appear on the keyboard. Pitched tracks will make up the melody of your song.
  • Unpitched Tracks: These tracks contain no pitch. Unpitched sounds can’t be sung but can be tapped out or beatboxed. Unpitched tracks will help keep the rhythm of your music.

Review an introduction to the tracks area below.

Arranging and Splitting Tracks

Mixing is a fun and intuitive way to make music, and that’s because the tracks area makes it easy to move around different sections of a song. Drag a track to the left or right to change its placement in the music. To break up a track into pieces, move the playhead to the part of the track where you want to make the division, double-tap or right-click, and then press Split.

You can freely move, split, and rearrange tracks to create the sound you want. You may also want to try the following settings to focus on specific aspects of a song.

  1. Mute a Track: The mute setting is used to silence a track without deleting it. Click the mute icon to mute a track and click it again to restore the sound. If you are using GarageBand on a mobile device, you'll have to drag the track headers (the instruments on the left side of the screen) to the right to see this icon.
  2. Solo a Track: The solo setting focuses on a single track by muting all the rest. You can activate this setting by clicking the headphone icon next to a track. Click this icon again to turn off Solo mode. If you are using GarageBand on a mobile device, you'll have to drag the track headers (the instruments on the left side of the screen) to the right to see this icon.

Review the slides below for a walkthrough of GarageBand's other features.

Layering

When you work with multiple tracks in the same project, you layer them on top of each other to make the best sound you can. Professionals use many different layering techniques, but the following examples are well-suited for beginners.

Types of Layering

  • Standard Two (Pitched and Unpitched): Most songs contain pitched and unpitched sounds, which results in a melody and clear rhythm. This is a great place for beginners to start.
  • Unpitched with Supportive Rhythmic Patterns: Layering unpitched tracks can help emphasize a beat. Imagine tapping out a rhythm on a desk while a friend snaps along. Another friend may begin clapping along after that. These sounds can build on one another while keeping the same tempo (the speed of the music). Your friends could also start snapping or clapping in between your beats, making the rhythm more complex.
  • Stagger Layers Staggering means arranging at different times. A staggered song might introduce a drumbeat by itself, then add a piano track, and finally, a singing track. Staggering your layers lets the audience hear sounds build on one another as each new track comes in. You can also stagger the end of a song, with each track ending at a different point.

Review the video below for instructions on how to use GarageBand to mix and layer MIDI tracks.

If you have a background in music, you may also be interested in Octave Layering. Octave layering involves adding a track with the same notes played at a different octave. Combining notes at different pitches creates a richer, more complex sound.

Basic Effects and Adjustments

In addition to the MIDI piano roll, there are a series of handy effects that you can use to change the pitch, tempo, and dynamics (the volume of the music). Below is a list of some of those effects and how they can change your sound.

  • Loop: This copies and repeats part of a track, which can be great for building rhythm and patterns.
  • Pitch Bend: This changes the pitch of your note up or down.
  • Auto-Tune: This automatically puts sounds in tune.
  • Reverb: This adds an echoey quality to your sound.
  • Vocoder: This changes sounds by adding filters to a track.
  • Modulation: This changes sounds in a track, usually by changing the key.
  • Quantization: This shifts a track to keep sounds in line with the piece's rhythm.
While this course focuses on MIDI tracks, all of the techniques above (except quantization) can be used for digital audio.

Your Turn

Of course, learning about music is more fun when you can try it for yourself. Complete the following exercises in Garageband or a similar DAW software (like Soundtrap or Bandlab) to get a feel for mixing and practice working with tracks.

  1. Create a composition using two pre-recorded loops.
  2. Create a composition using a pitched loop and an unpitched loop.
  3. Create a composition using at least three loops. Use a staggered layer effect at the beginning and the end.

These techniques are just the beginning for mixing and layering, but those skills are all you need to start making fun, catchy music. Explore what pre-recorded loops your instruments and software have available to make all kinds of combinations.

Chord Progression

If you’ve come this far, you’re ready to play MIDI instruments and mix some tracks. But if you have a background in music, or you’re looking to compose your own songs without the help of pre-recorded tracks, you’ll want to know about chord progressions. If you’re not ready to dive into musical theory just yet, that’s completely fine. But by reviewing the information below, you’ll get an overview of how to write, play, and mix a song using MIDI instruments.

If you’re new to reading music and how songs are divided into notes, the following PDF provides a very helpful starting point.

What is a Chord?

Chord Definition: two or more notes played together at the same time

What is a Chord Progression?

Chord Progression Definition: a pattern of chords typically depicted with Roman numerals

Many of your favorite songs contain a few simple chord progressions, though which progressions are most popular change depending on the genre. Learning to work with chord progressions can help you play and write many different kinds of songs, so let’s take a look at some of the most common chord progressions.

What are Some Common Chord Progressions?

Popular Chord Progressions: I-IV-I-I, I-V-vi-IV, ii-V-I
Repetition in Chord Progression Example

Try It for Yourself

The mobile GarageBand app has a great feature to help you practice chord progressions: smart instruments. This feature lets users create chords by tapping “chord strips” on the screen. The top of each strip marks the root note. You can tap anywhere on the chord strip to play a chord of that type. The higher on the strip you press, the higher the pitch of the chord will be. You can add a smart instrument by adding a track and selecting the Smart option under the piano, drums, strings, bass, or guitar tab.

Once you know how the Roman numerals line up with the tabs on a smart instrument, you can plug in popular chord patterns to create quick, easy, and catchy tunes. Check out the example below.

Use smart instruments to practice chord progressions.

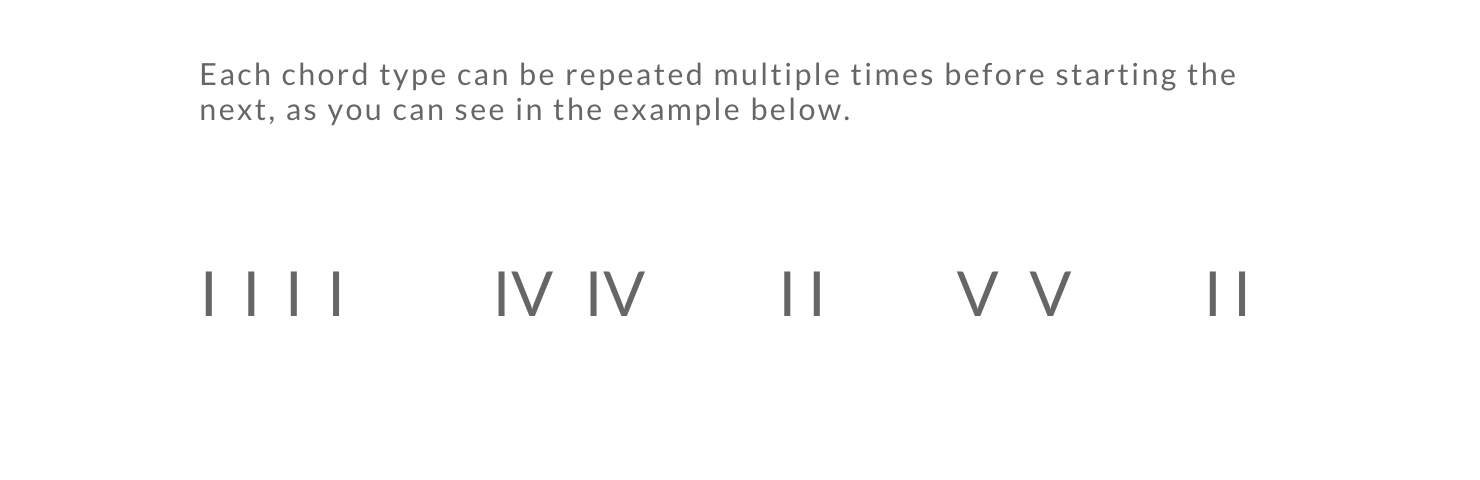
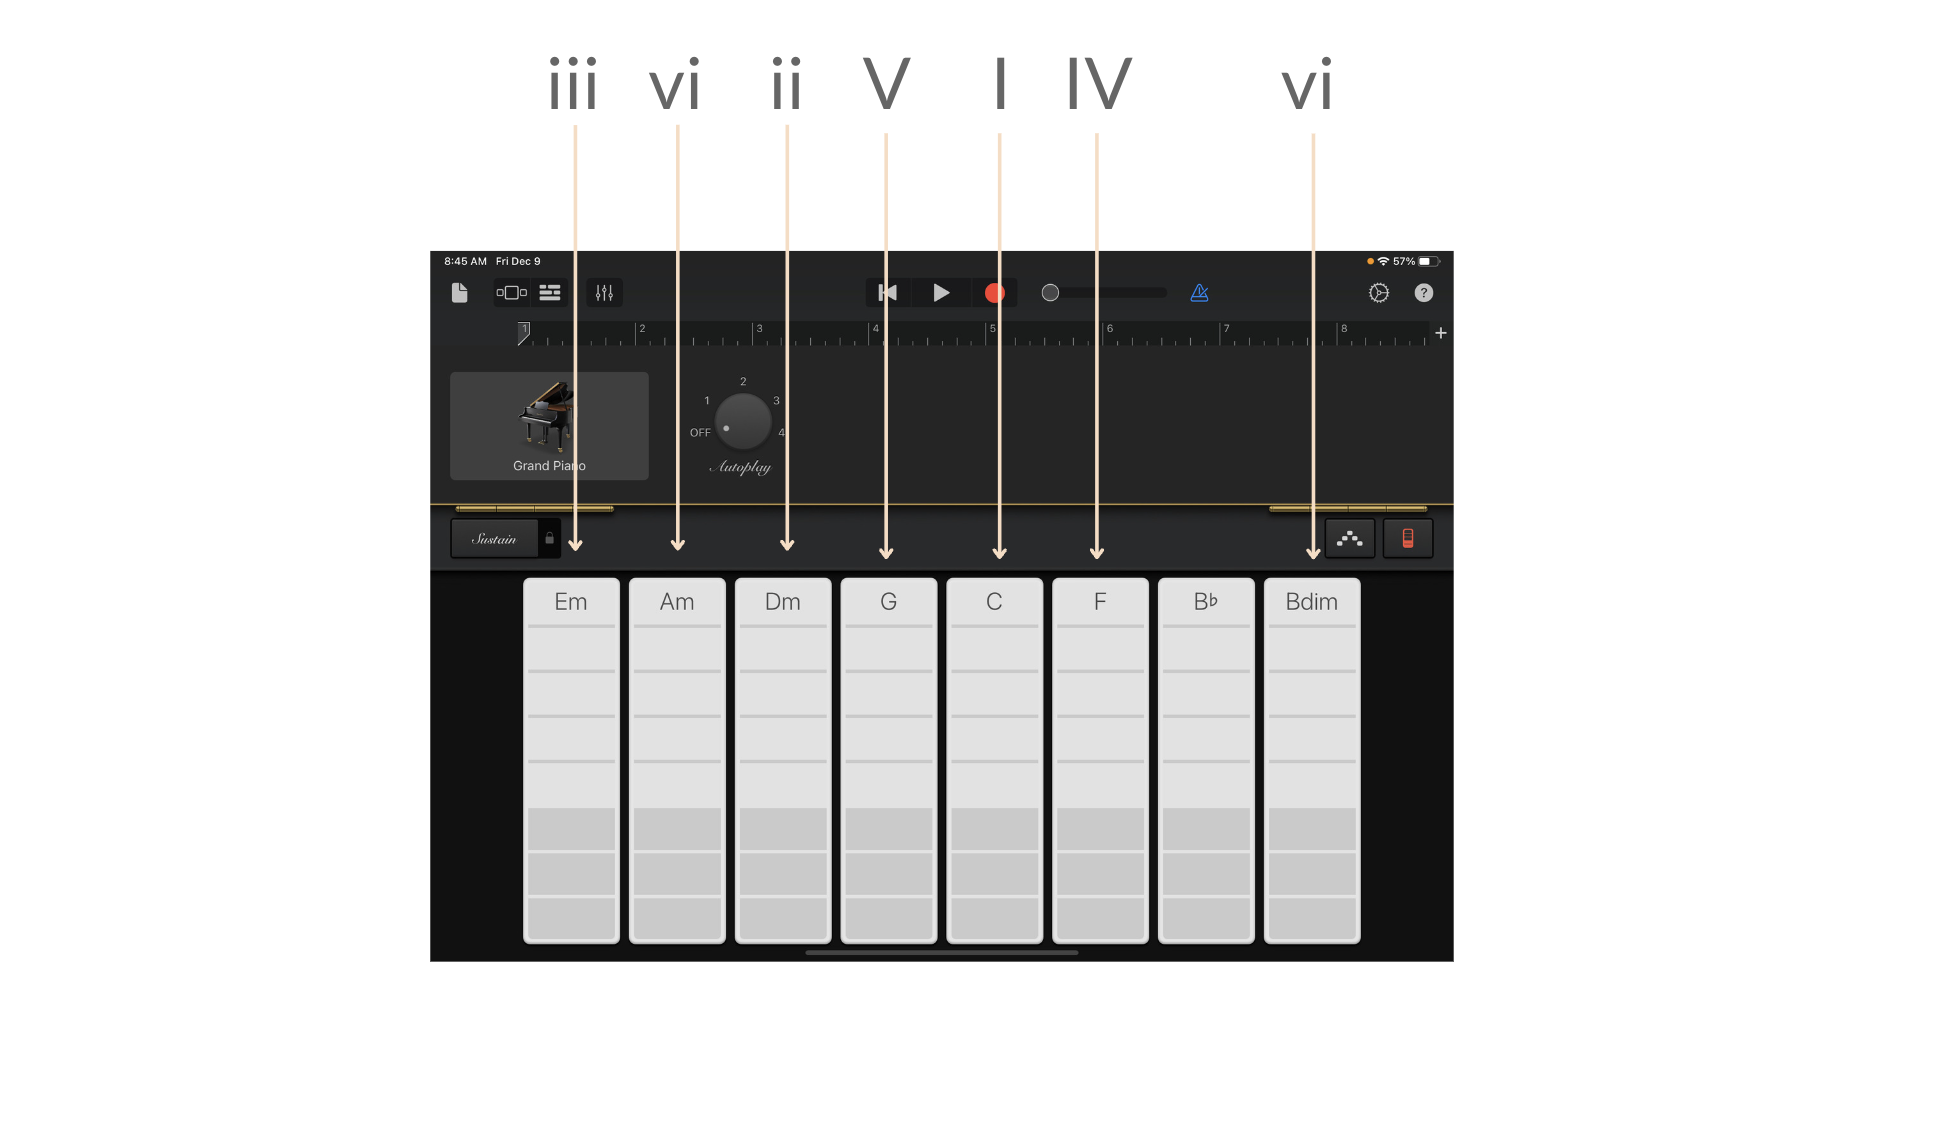
If you have access to the mobile GarageBand app, create a smart piano track and use the chart above to play the following chord progression: I - IV - I - V - I. Remember, you can play multiple chords in each part of the progression as long as you’re using the same chord strip.

Just like that, you’re playing chord progressions! Think about how the pattern of chords sounded as you played. None of the notes should have sounded out of place. When you use chord progressions, sounds naturally build on each other.

More on Chord Progressions

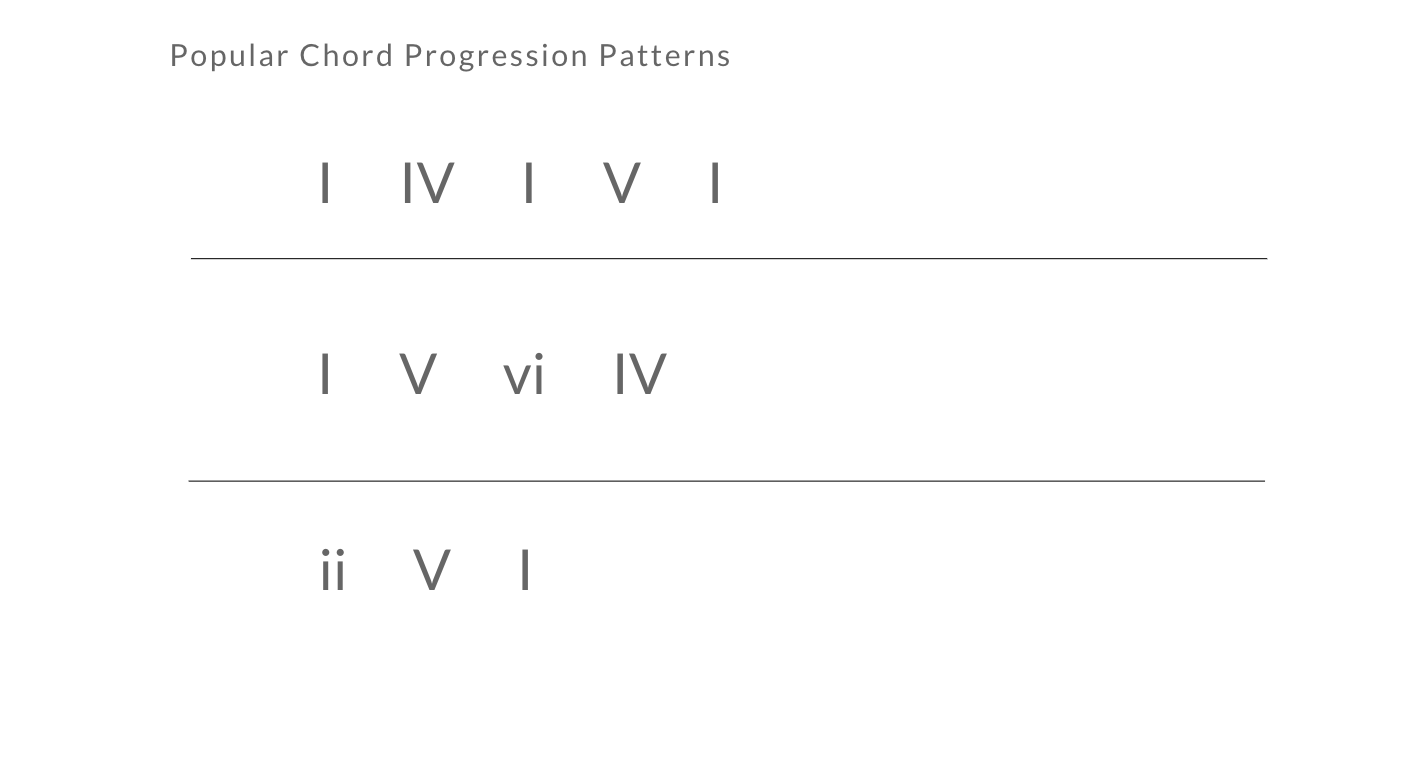
A secret to songwriting when creating chord progressions is to start and end with the same chord, as in the I- IV- I-V-I progression.

Another strategy you can use to make great-sounding chord progressions is to end segments of songs on I, IV, or V chords (I and V are the most common).

If you’re ever asked how to “count” a song, you could answer it two different ways: One answer would clarify the time signature, and the other would clarify the rhythmic pattern. Time signatures define how long each measure (an easily divided piece of the song) will last. The most commonly used time signature is 4/4; meaning each measure is made up of 4 "counts" or 4 beats in length. Other time signatures could include 2/4, 3/4, 6/8, 5/4, and cut time. Clarifying rhythmic patterns includes "counting" the rhythmic language within each measure using standard rhythmic notation.

When we combine a chordal structure with a melody, the rhythmic pattern can look different, even in the same time signature. A chord progression may contain four chords that are each a long, sustained note like a whole note, but the melody mixed with that progression can look different: some notes in the melody may last for one beat, two beats, or even half of a beat. It’s great for a melody and supporting chord progression to have different rhythms. Even though the melody is only based on a single line of notes, it’s usually the star of the show: memorable, catchy, and “hummable.” On the other hand, chord progressions work well in the background supporting the main melodic line. When they overlap and move at the same time, they keep your sound fresh and interesting.

As complicated as chord progressions can get, they really come down to what sounds work well together. And for now, it's enough to know that human minds just like the sound of certain chords ordered in specific ways. So, try not to feel overwhelmed; focus on having fun and making music you like to hear.

Keep It Going/Set a Goal

When you feel like you’ve got a handle on chord progressions, you can follow the steps below to try combining everything you’ve learned so far. If you’re not ready to try this yet, that’s OK. You can always save these instructions as a goal to work toward or stick to what works for you. This is just another way you can have fun making music.

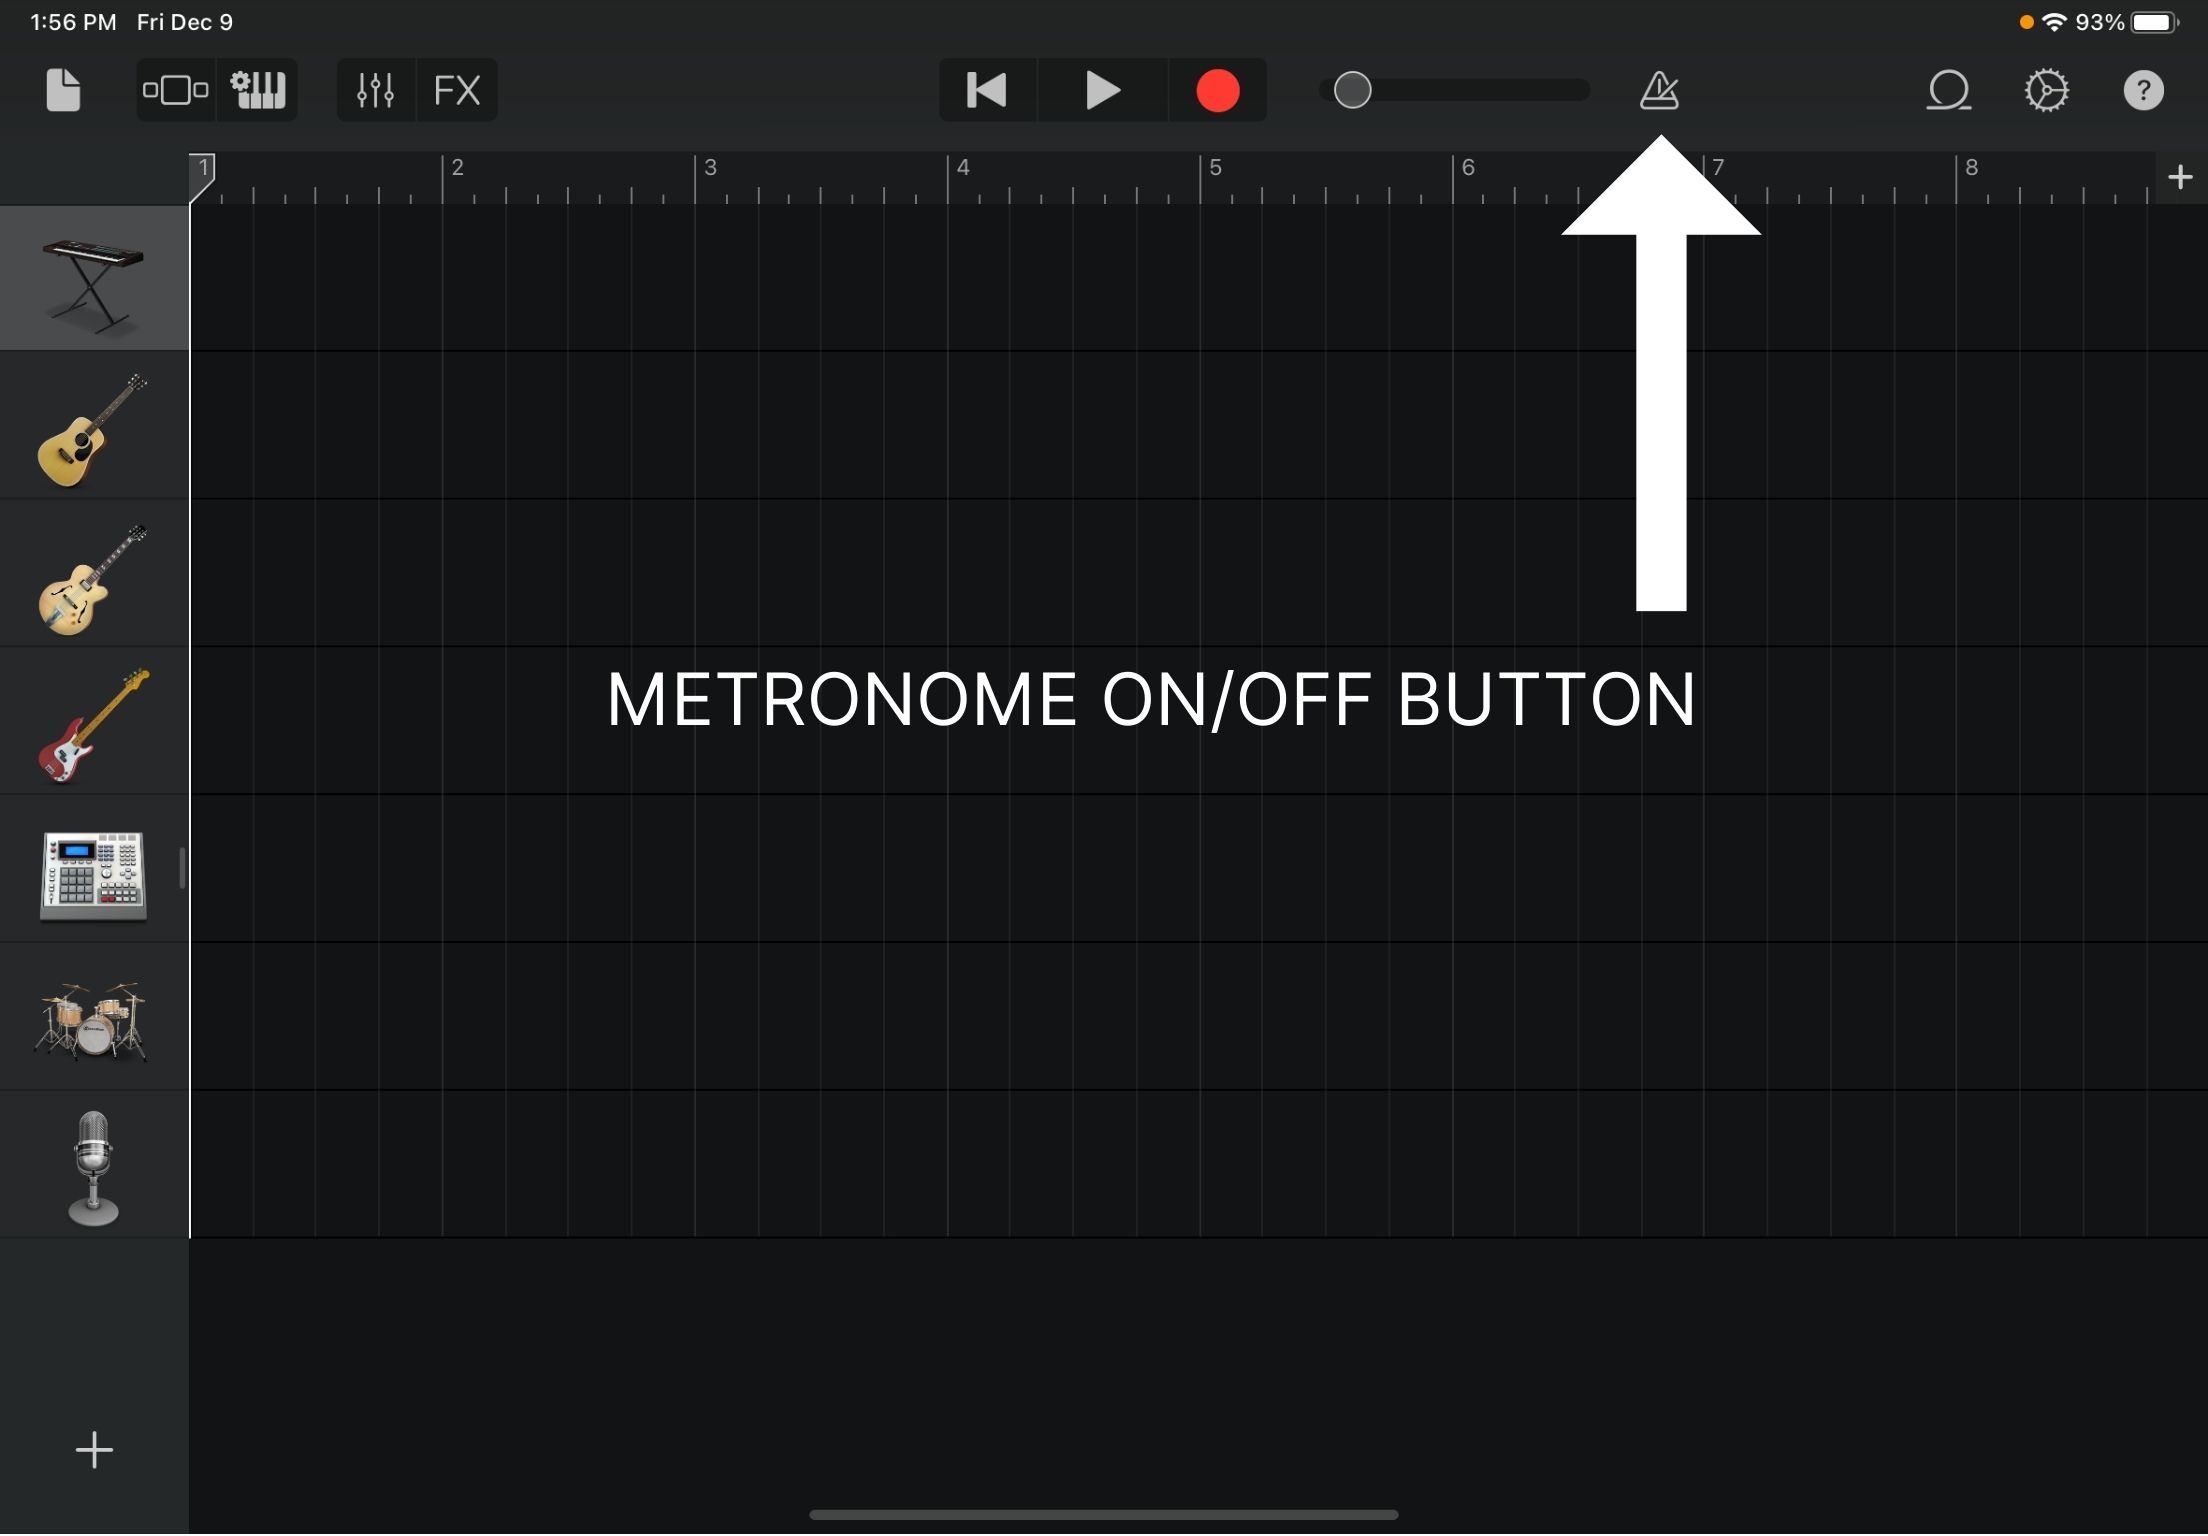
  1. Record a chord progression in GarageBand using any smart instrument. Try using the metronome to have each chord last four counts/beats. If you aren’t happy with your timing, you can use quantization to realign your timing. Double-tap the track, select Settings, Quantization, and choose a time signature under the Straight tab. Any of these should work for this exercise.
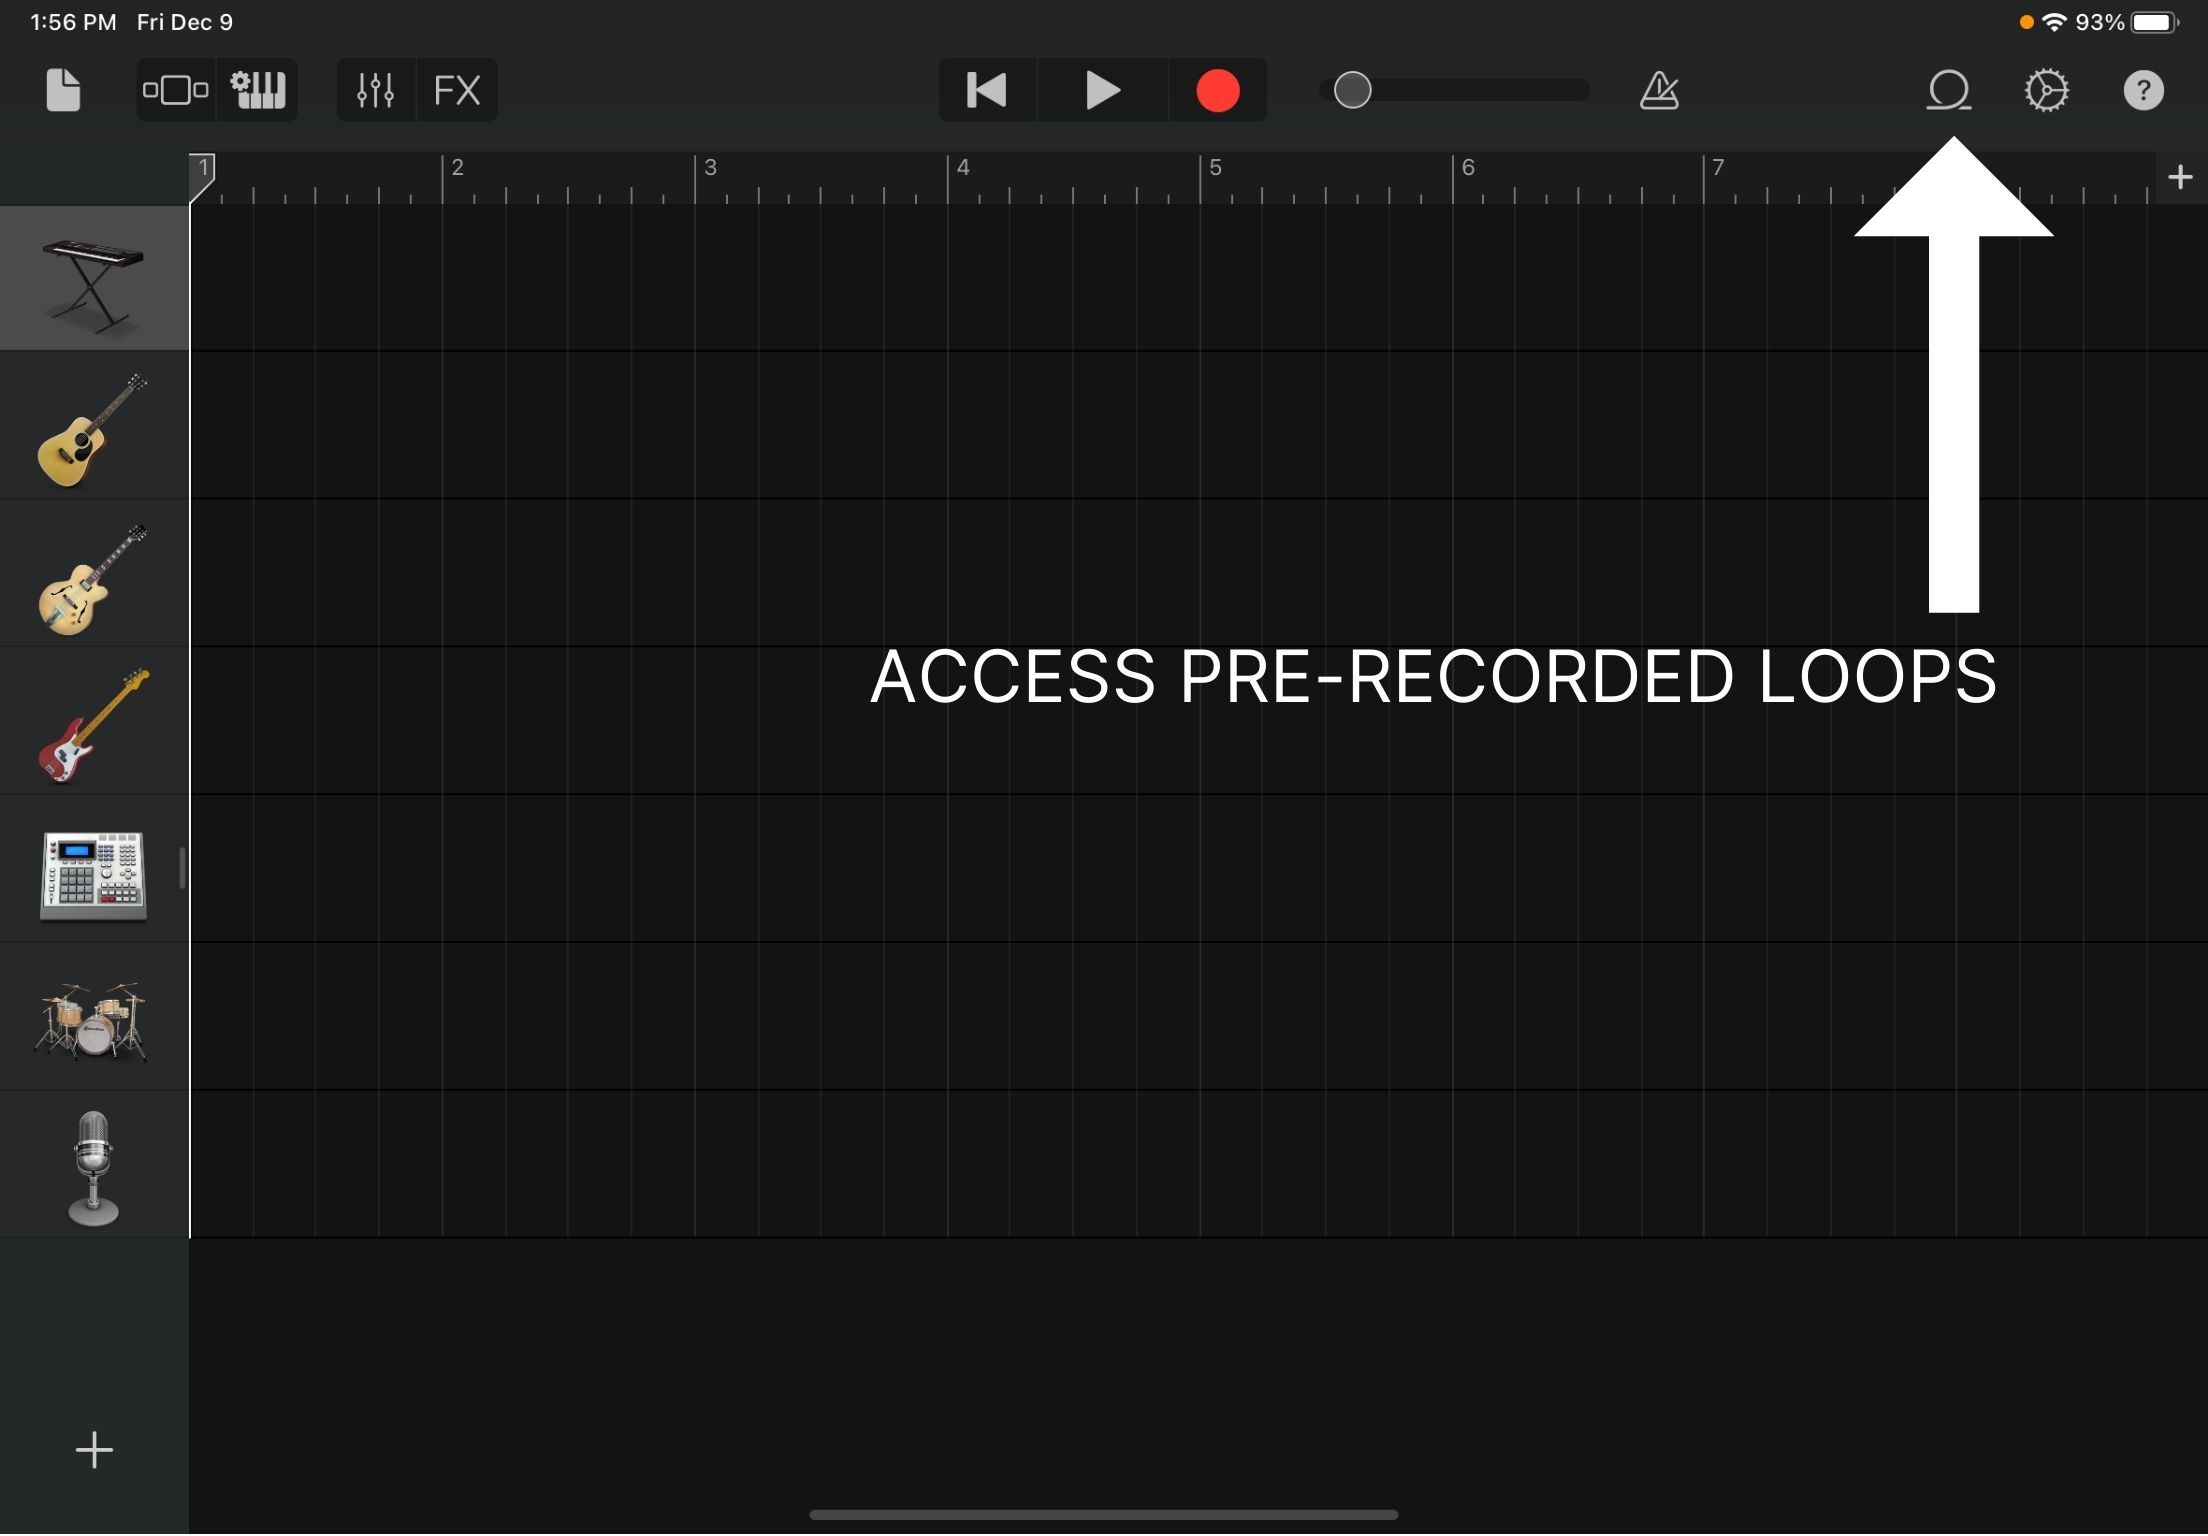
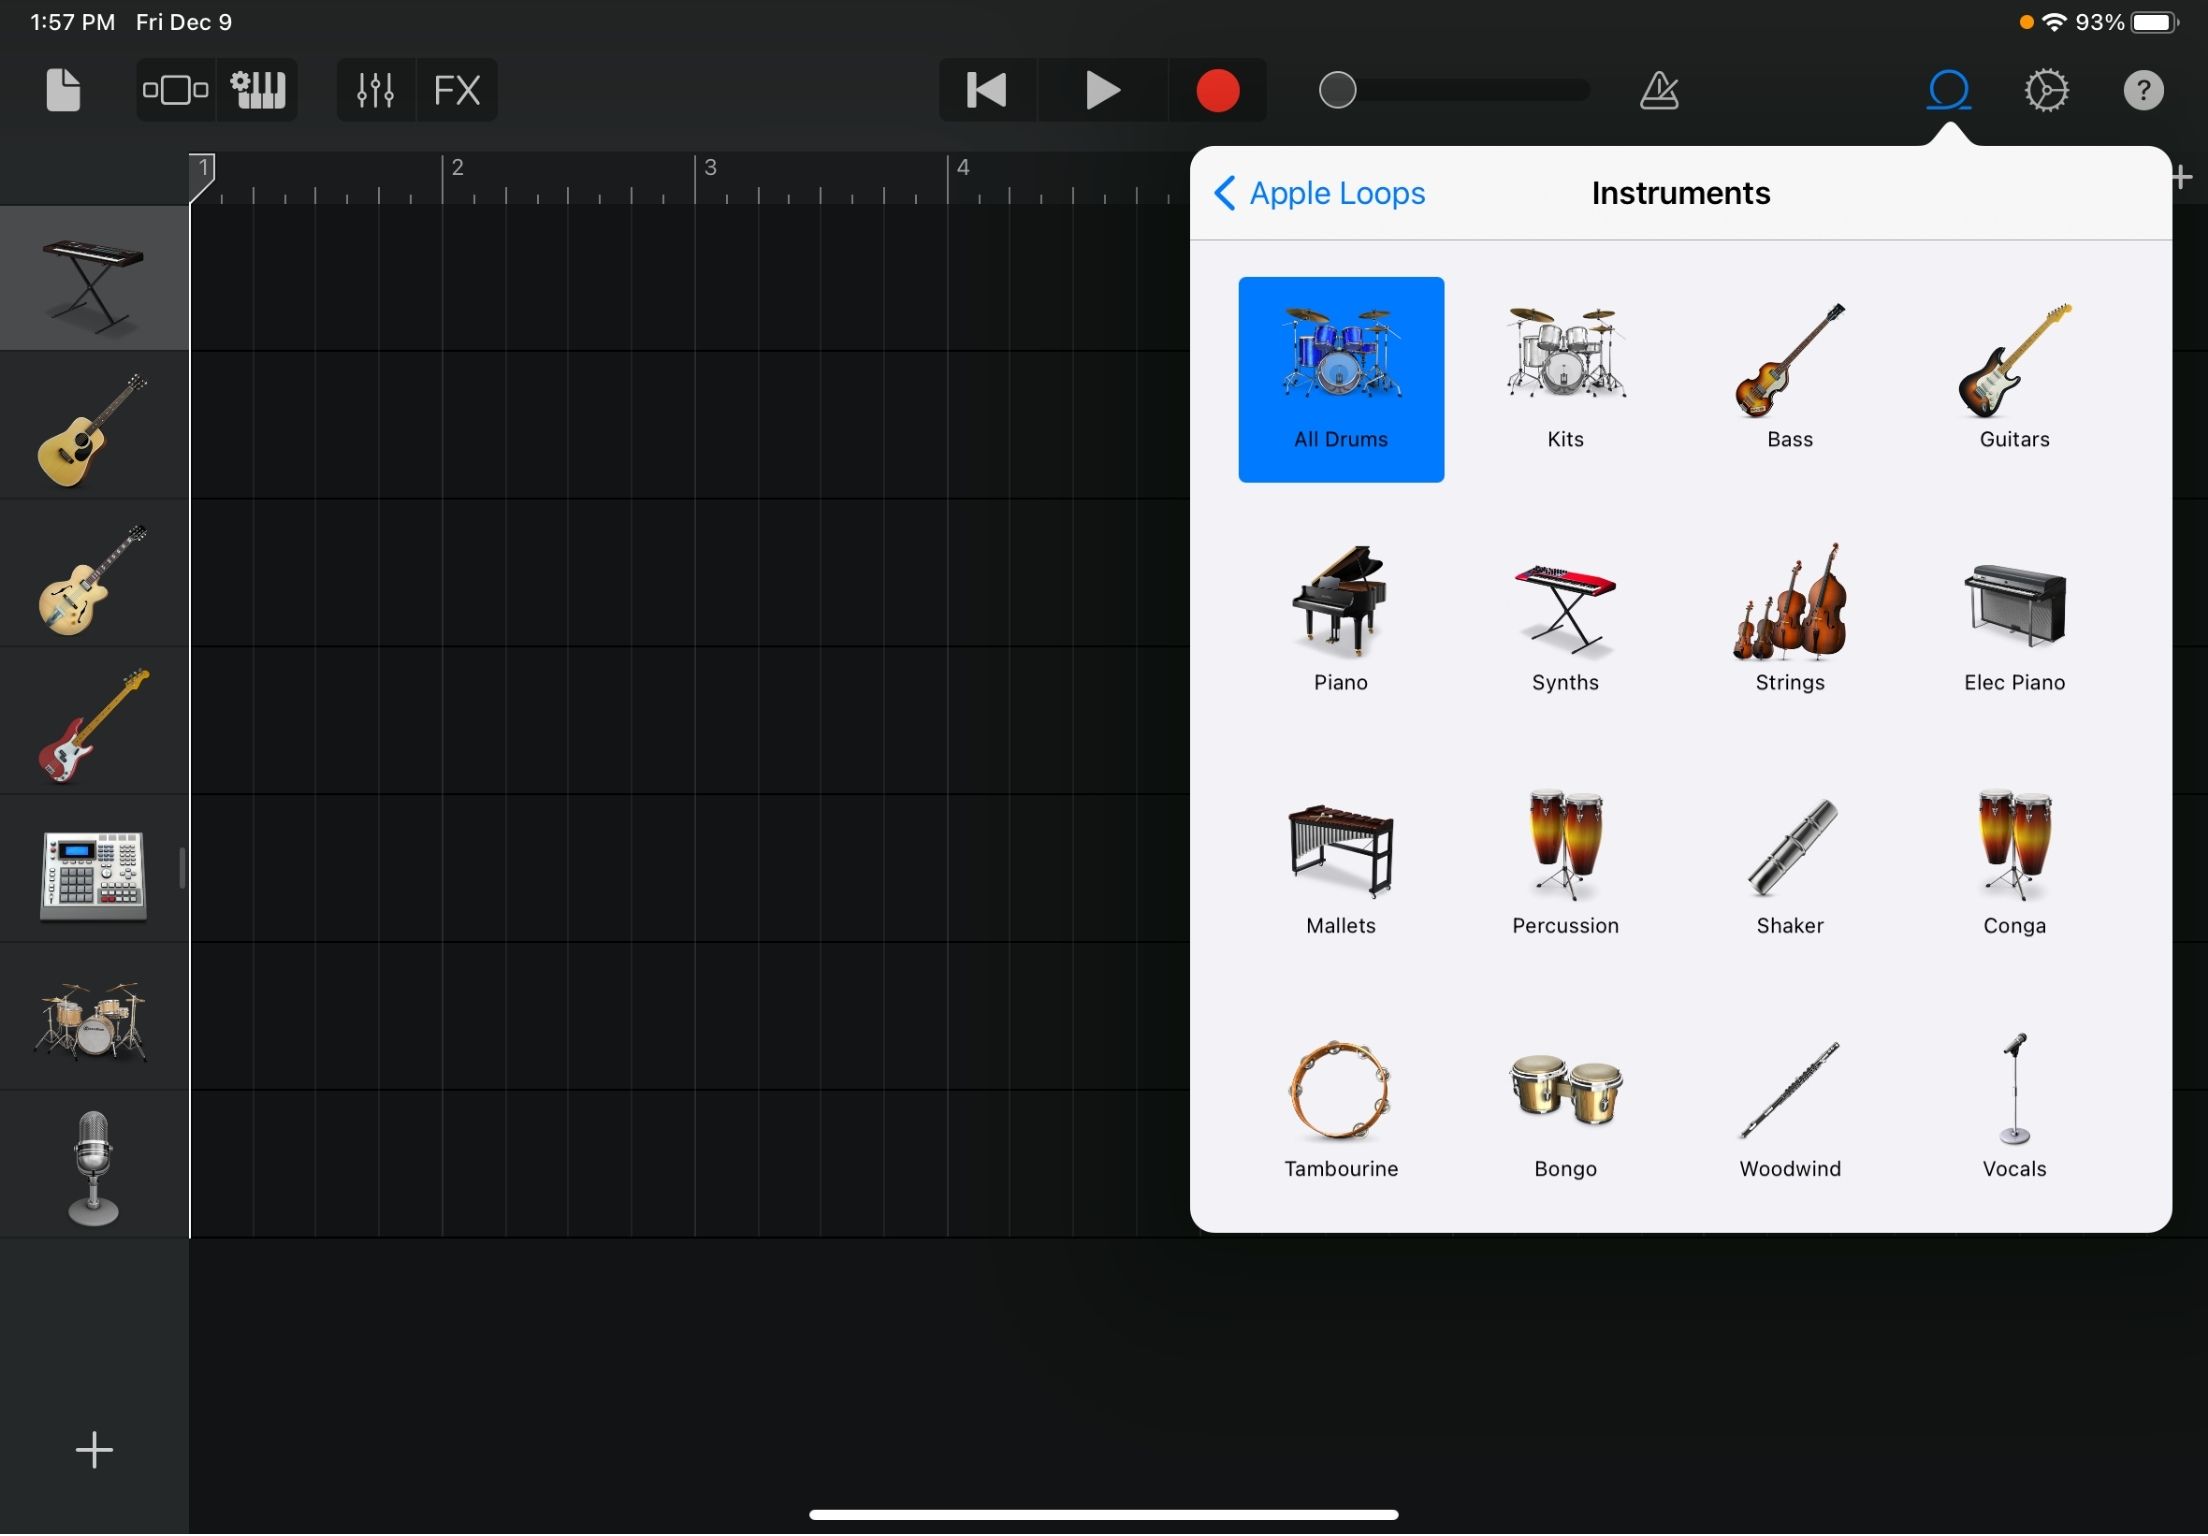
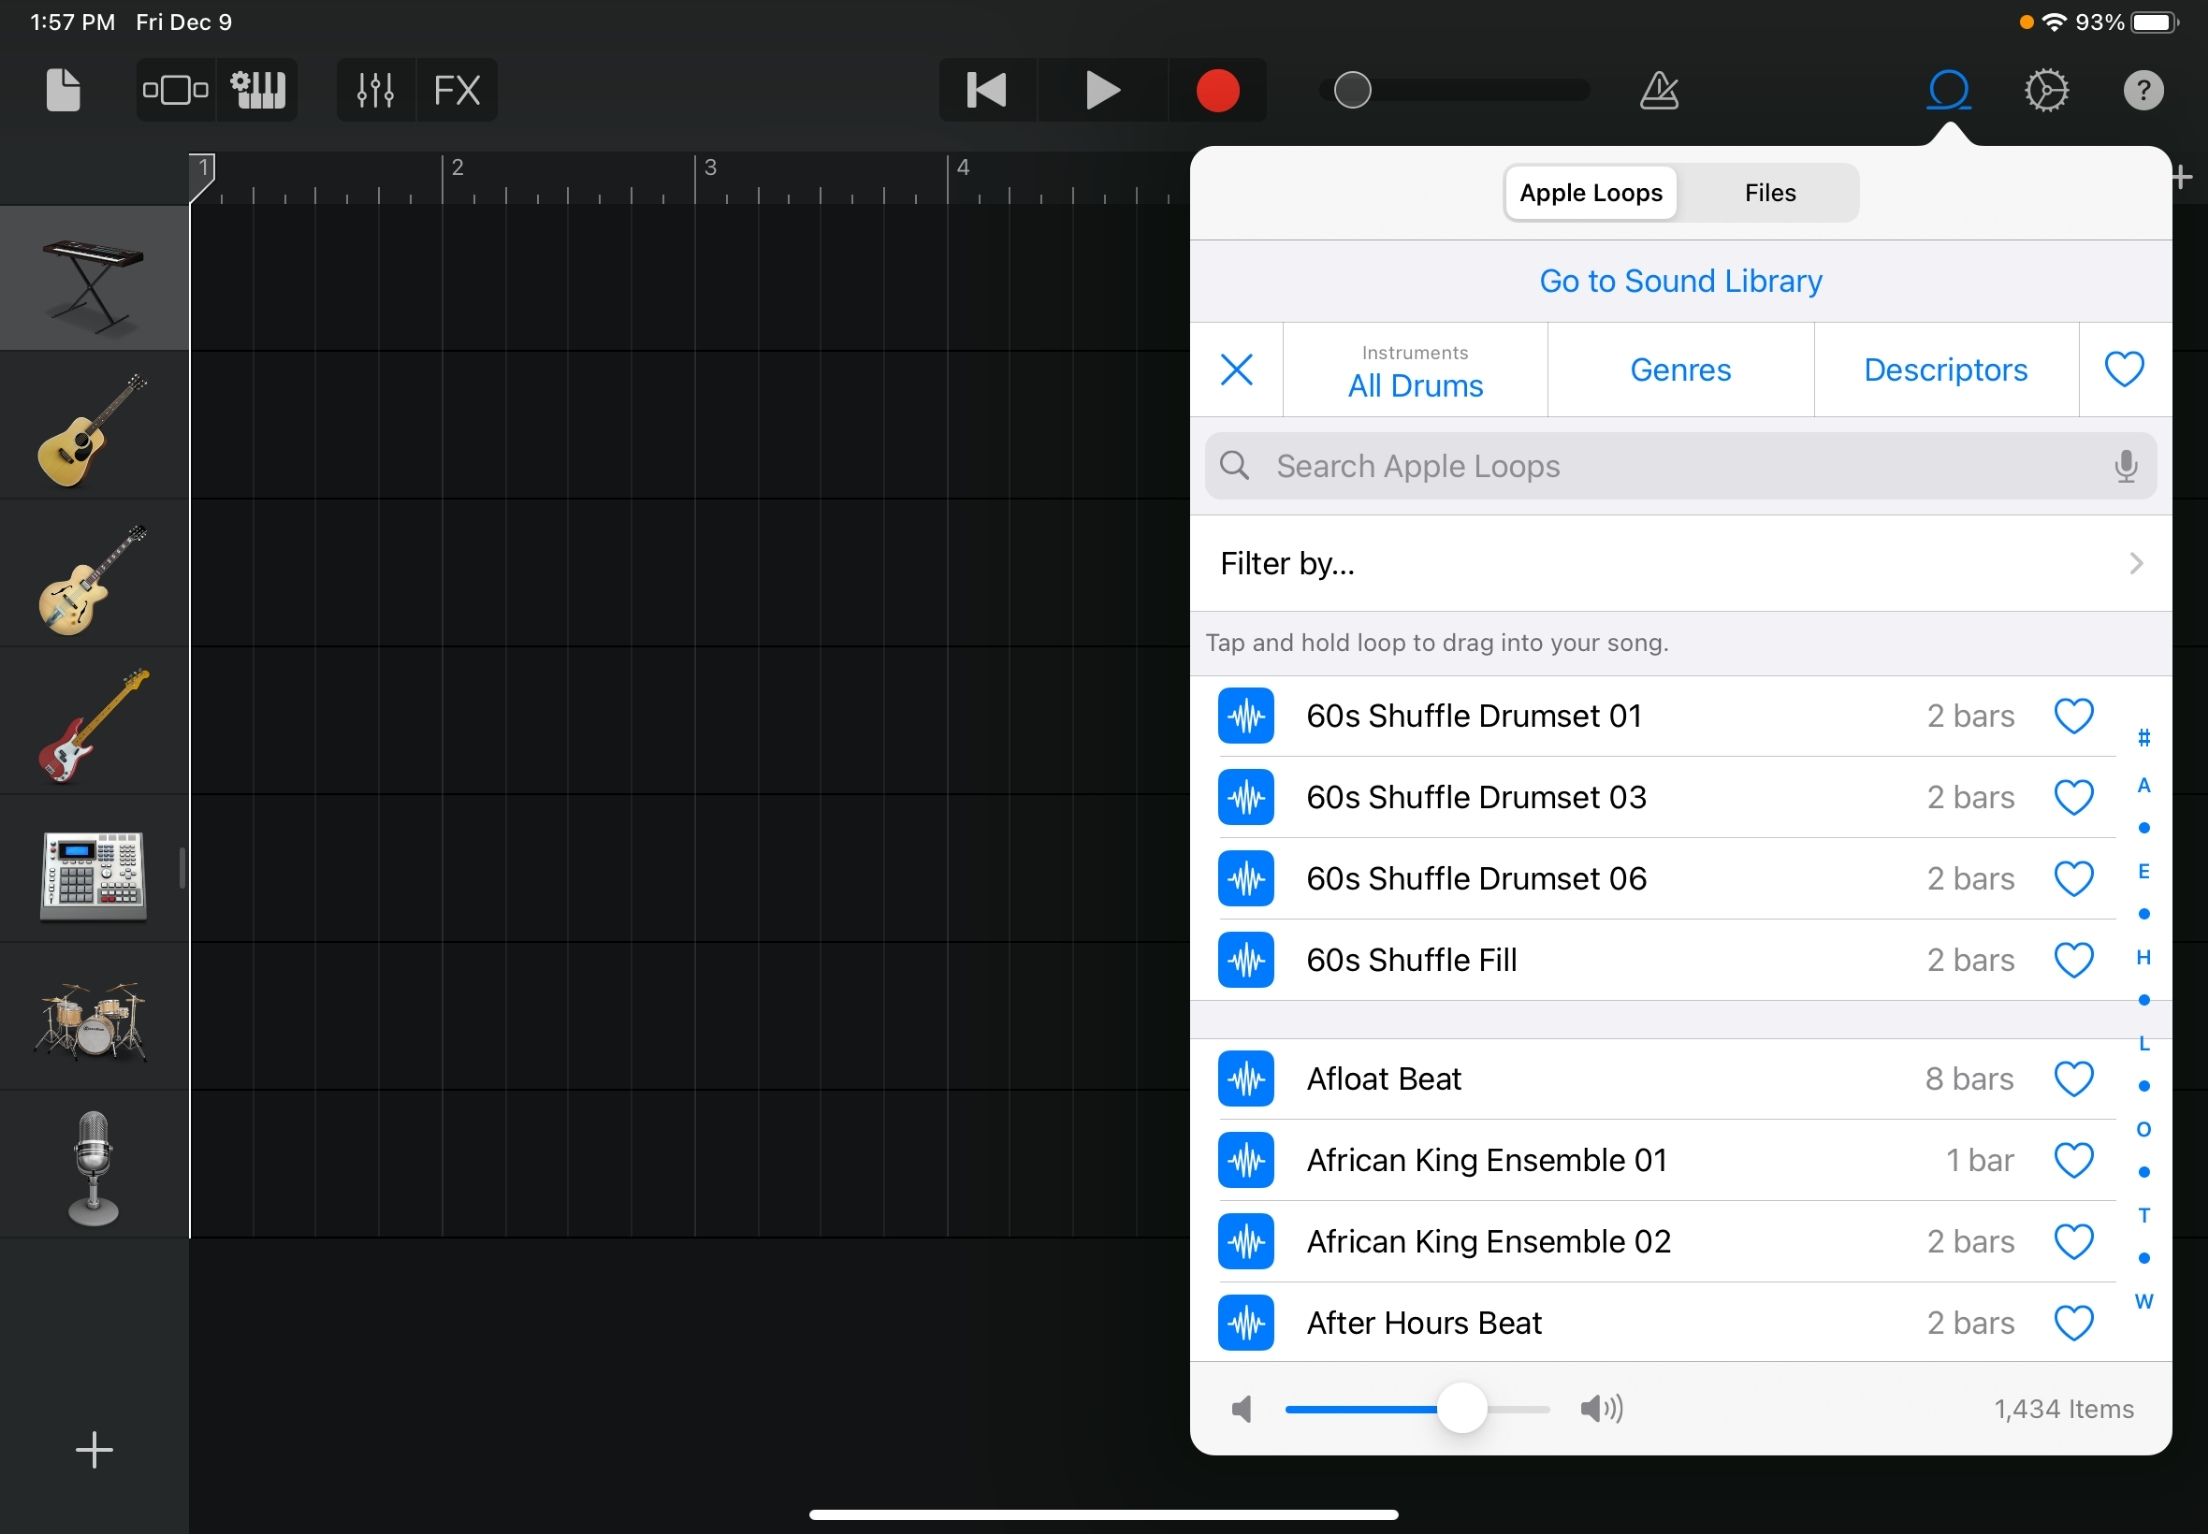
  2. Once you’re happy with your chord progression, record a melody. Add a new pitched instrument with a keyboard or strings. Using the metronome to time your notes, record a tune that keeps time with the chord progression. Play one note at a time, and try to focus mainly on notes that make up the chords you used in the last track. For example, while the CEG chord is playing for four counts, try to play mostly C, E, and G notes one at a time. Remember to give the melody a different rhythm than your chord progression. Have your notes last different lengths to keep things fresh.
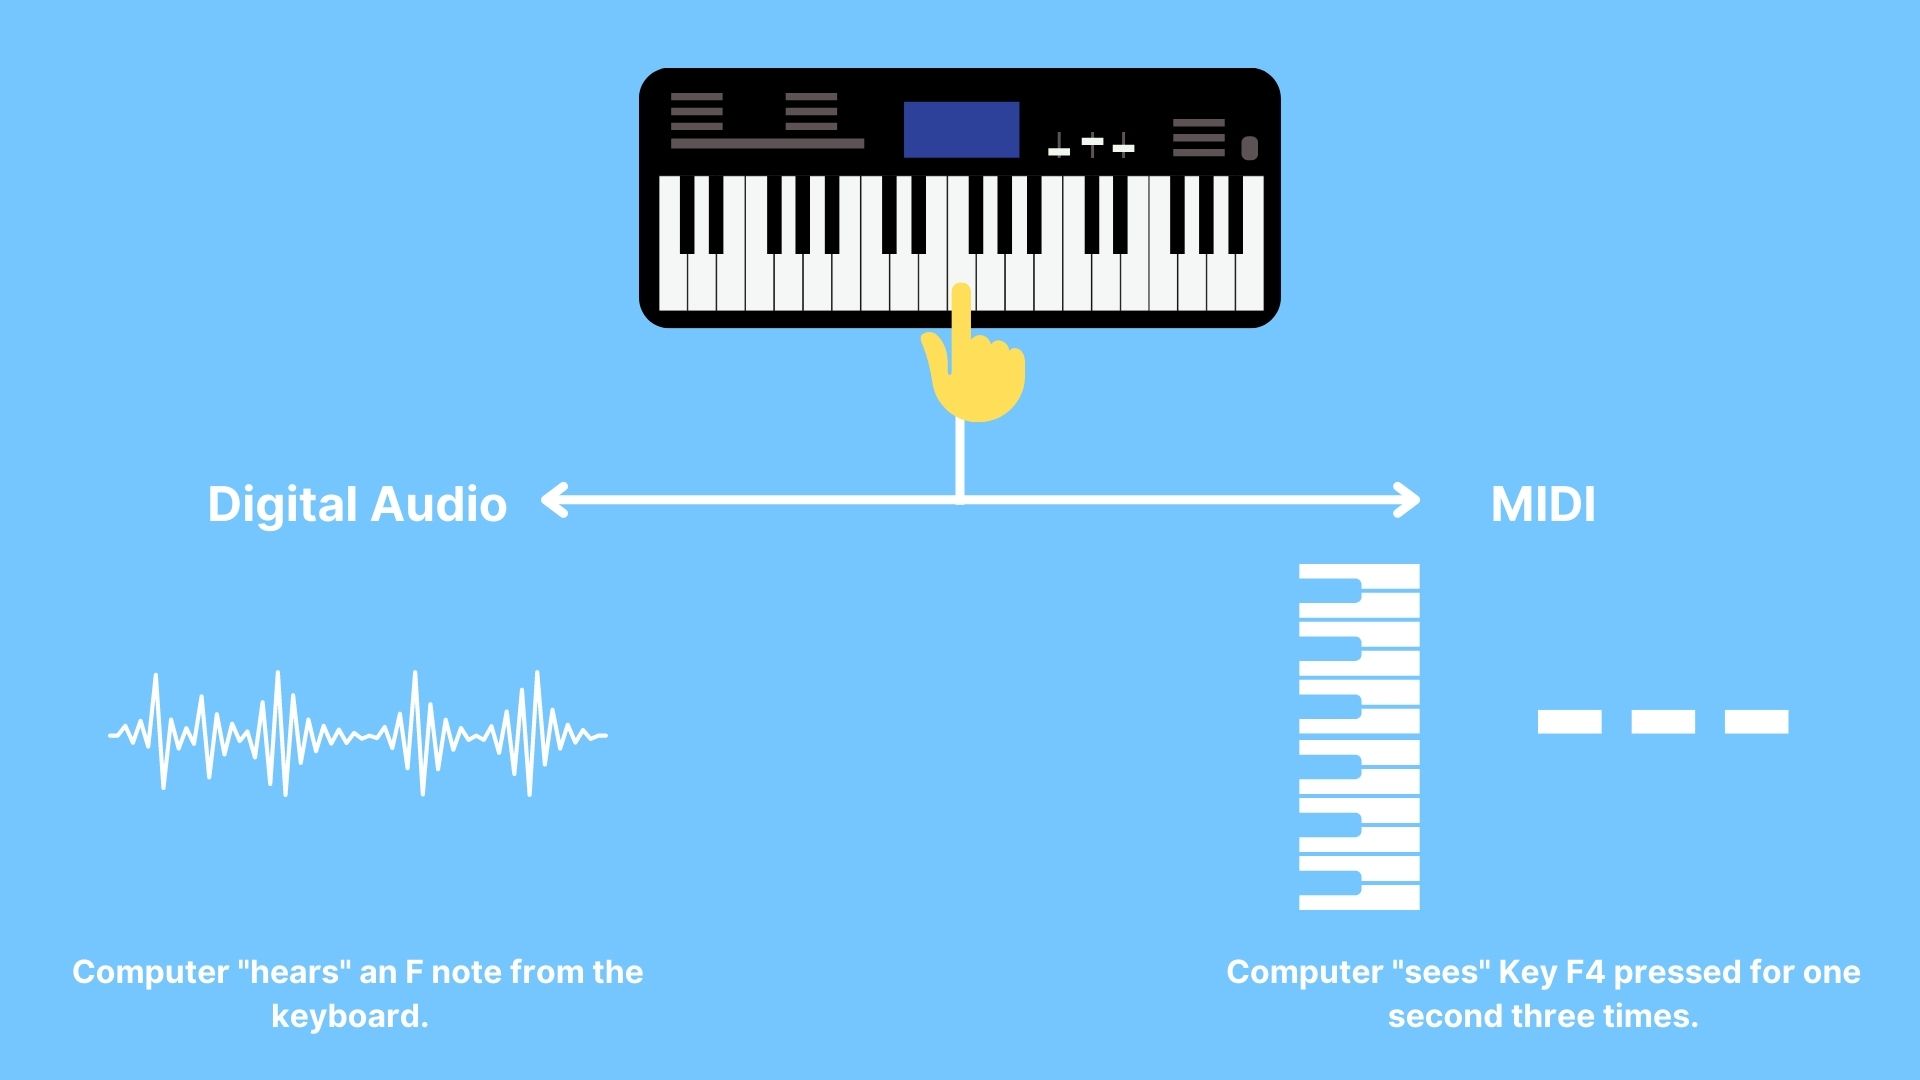
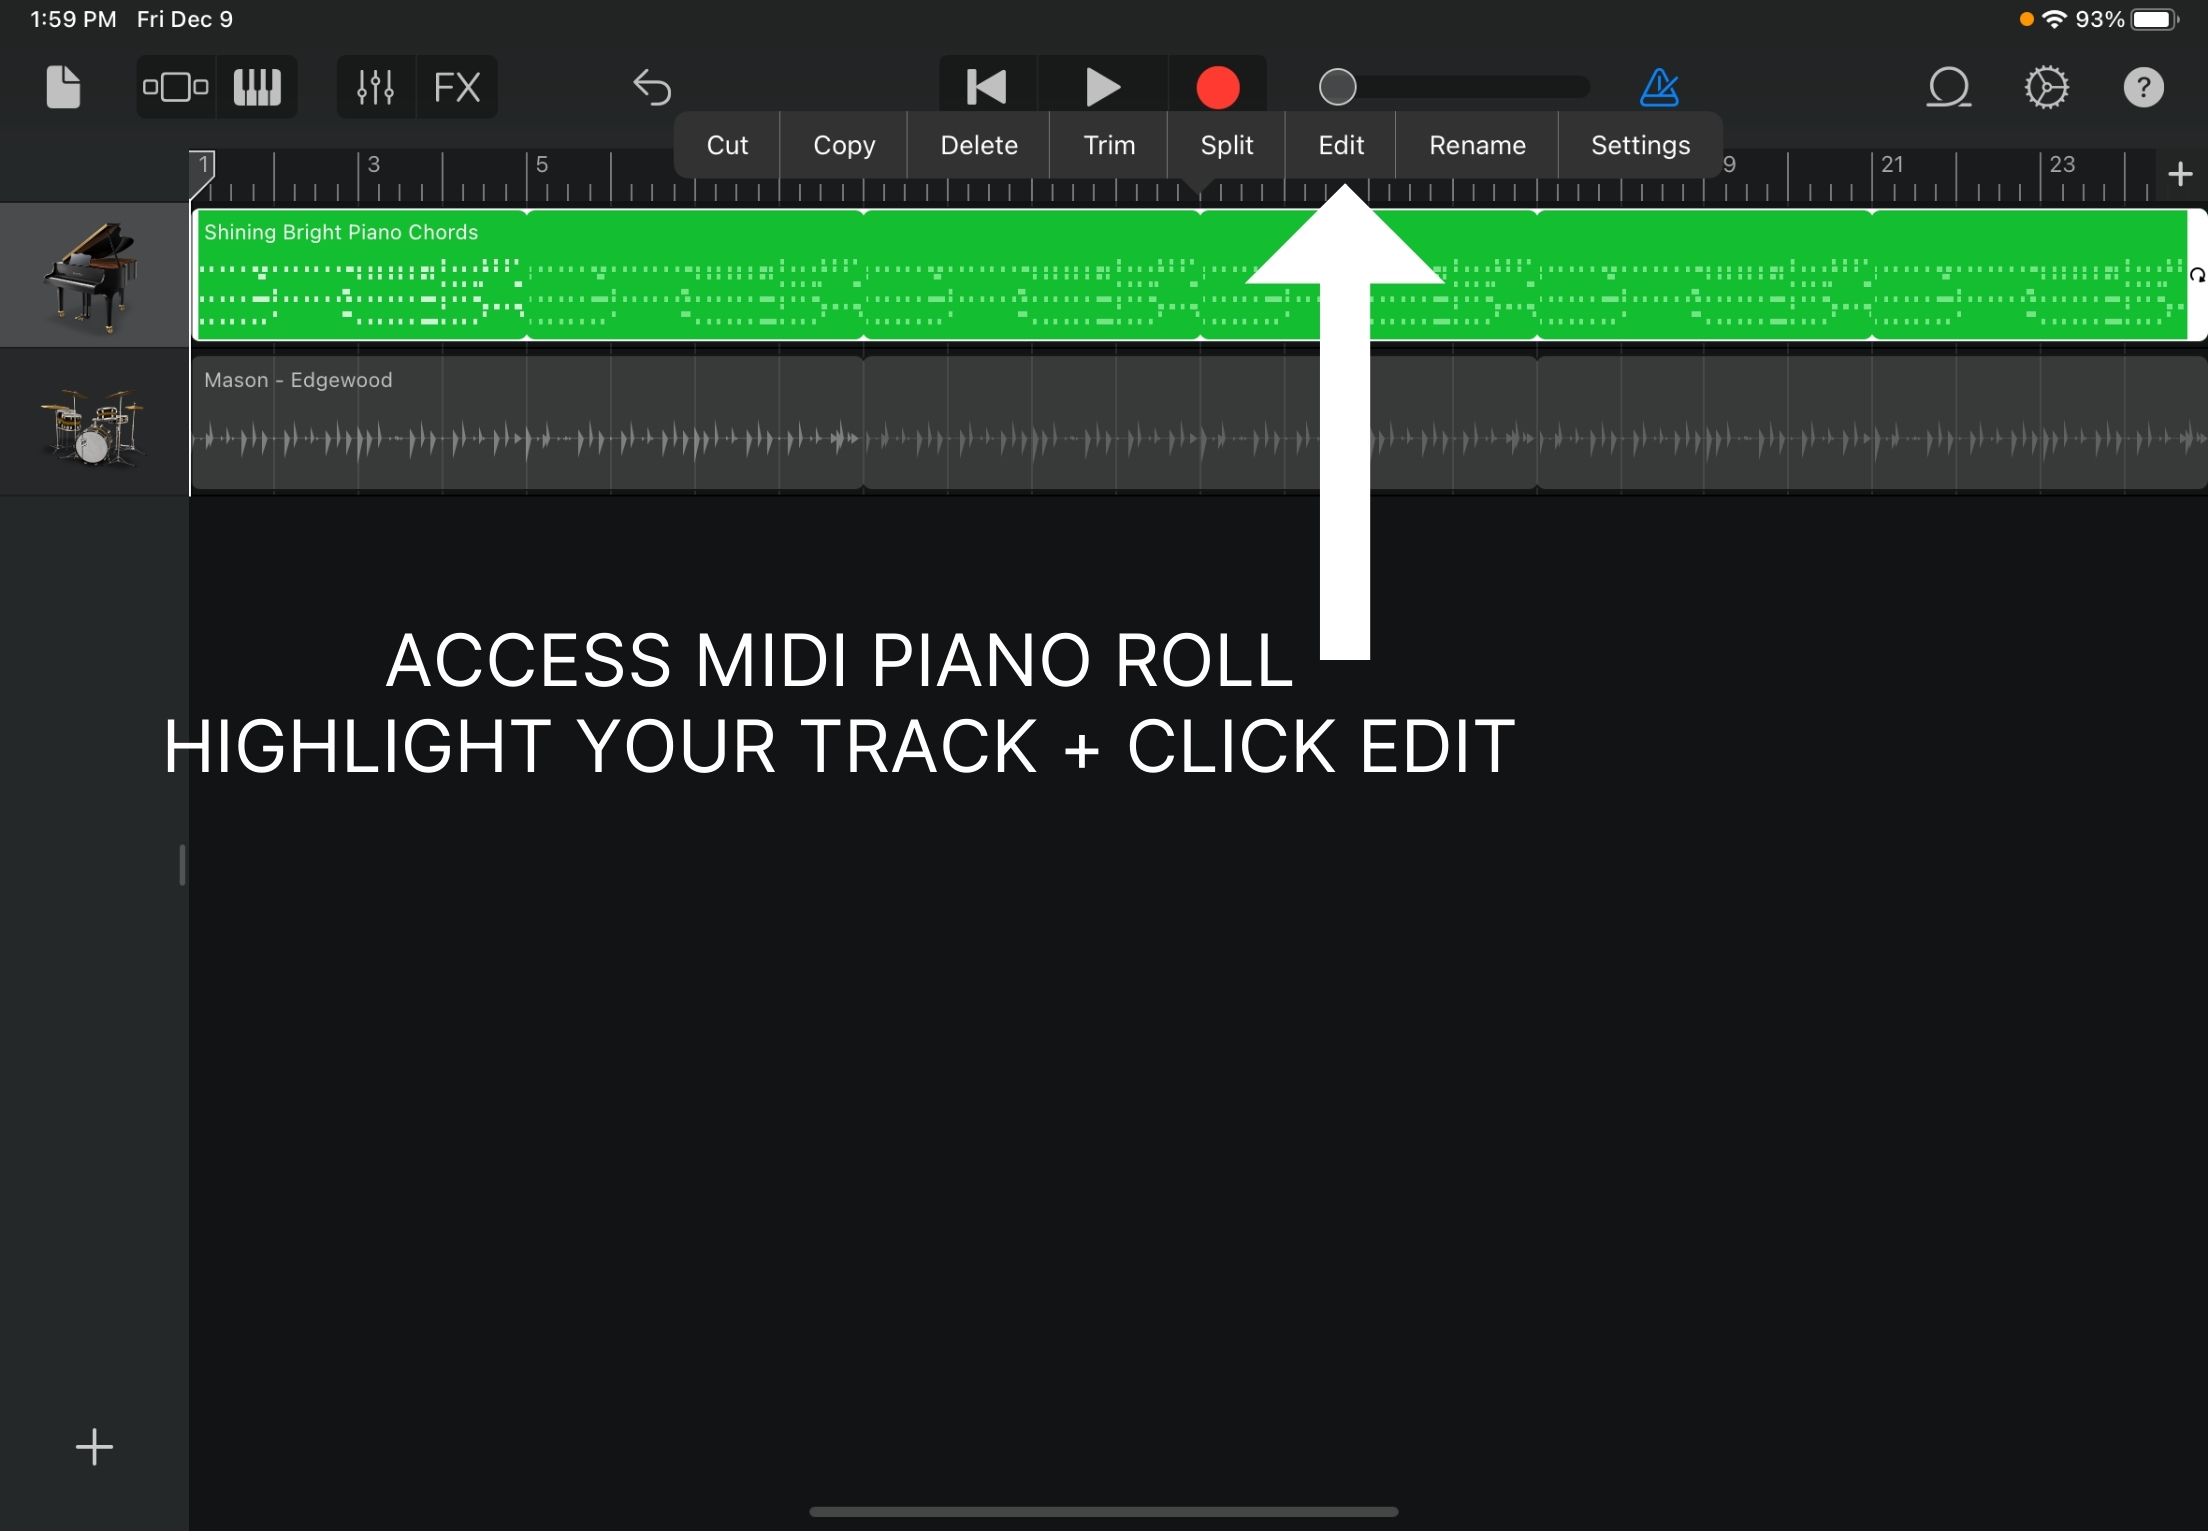
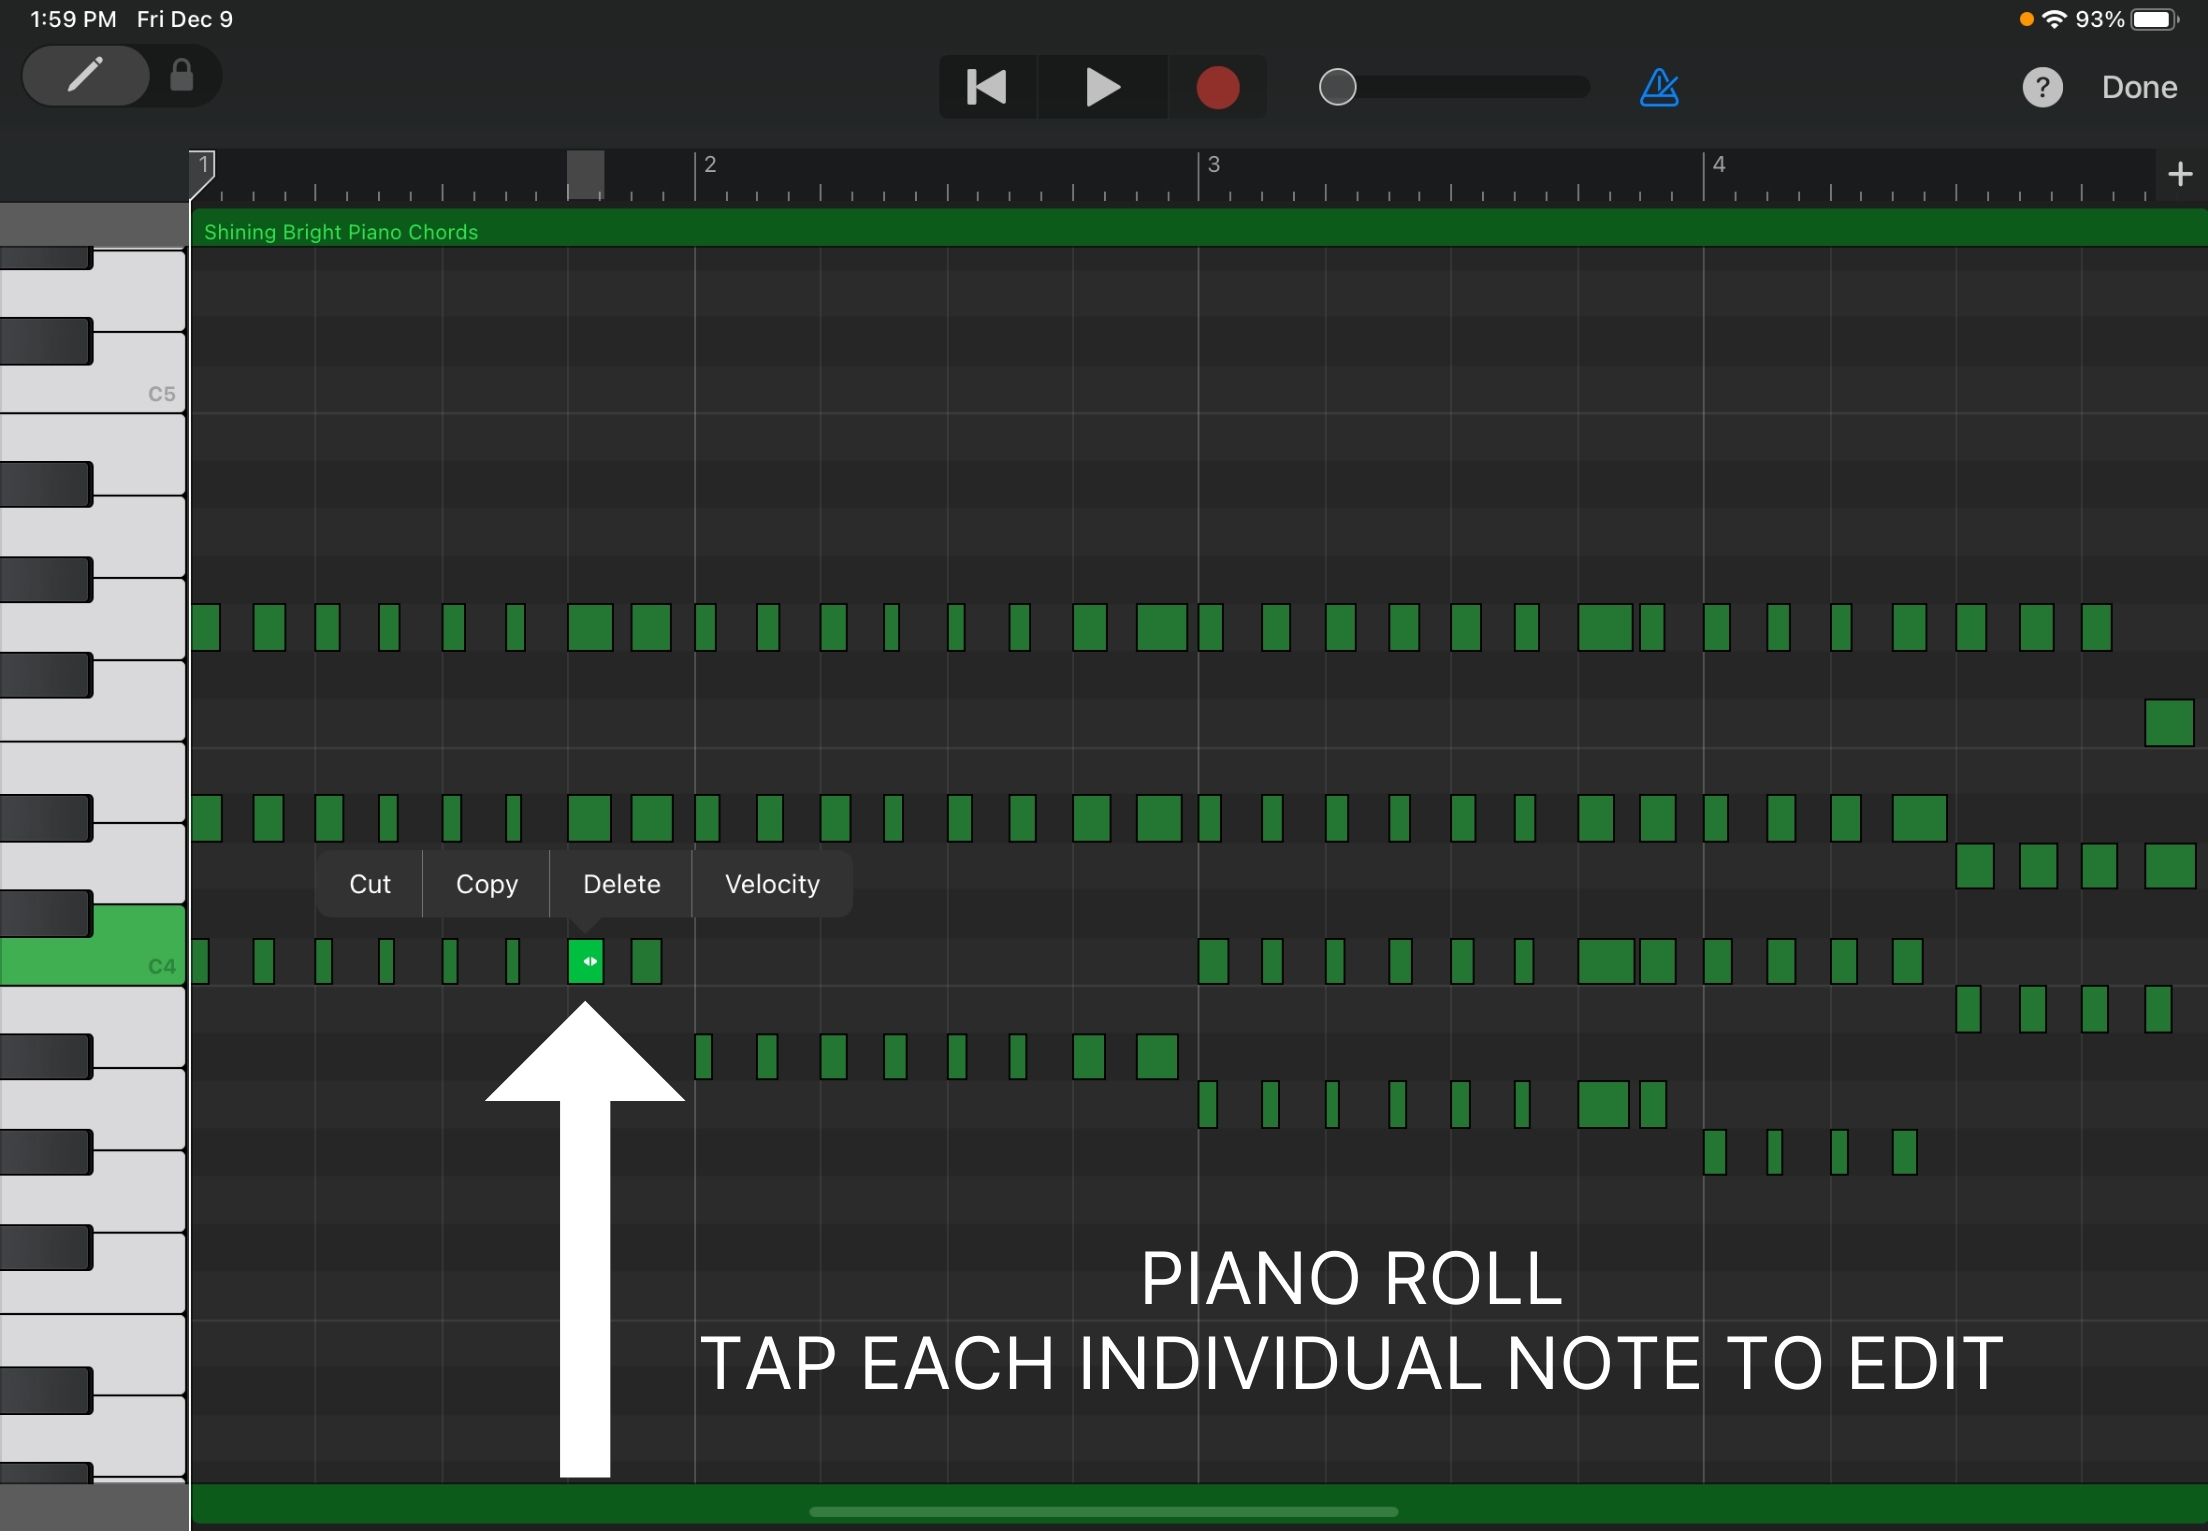
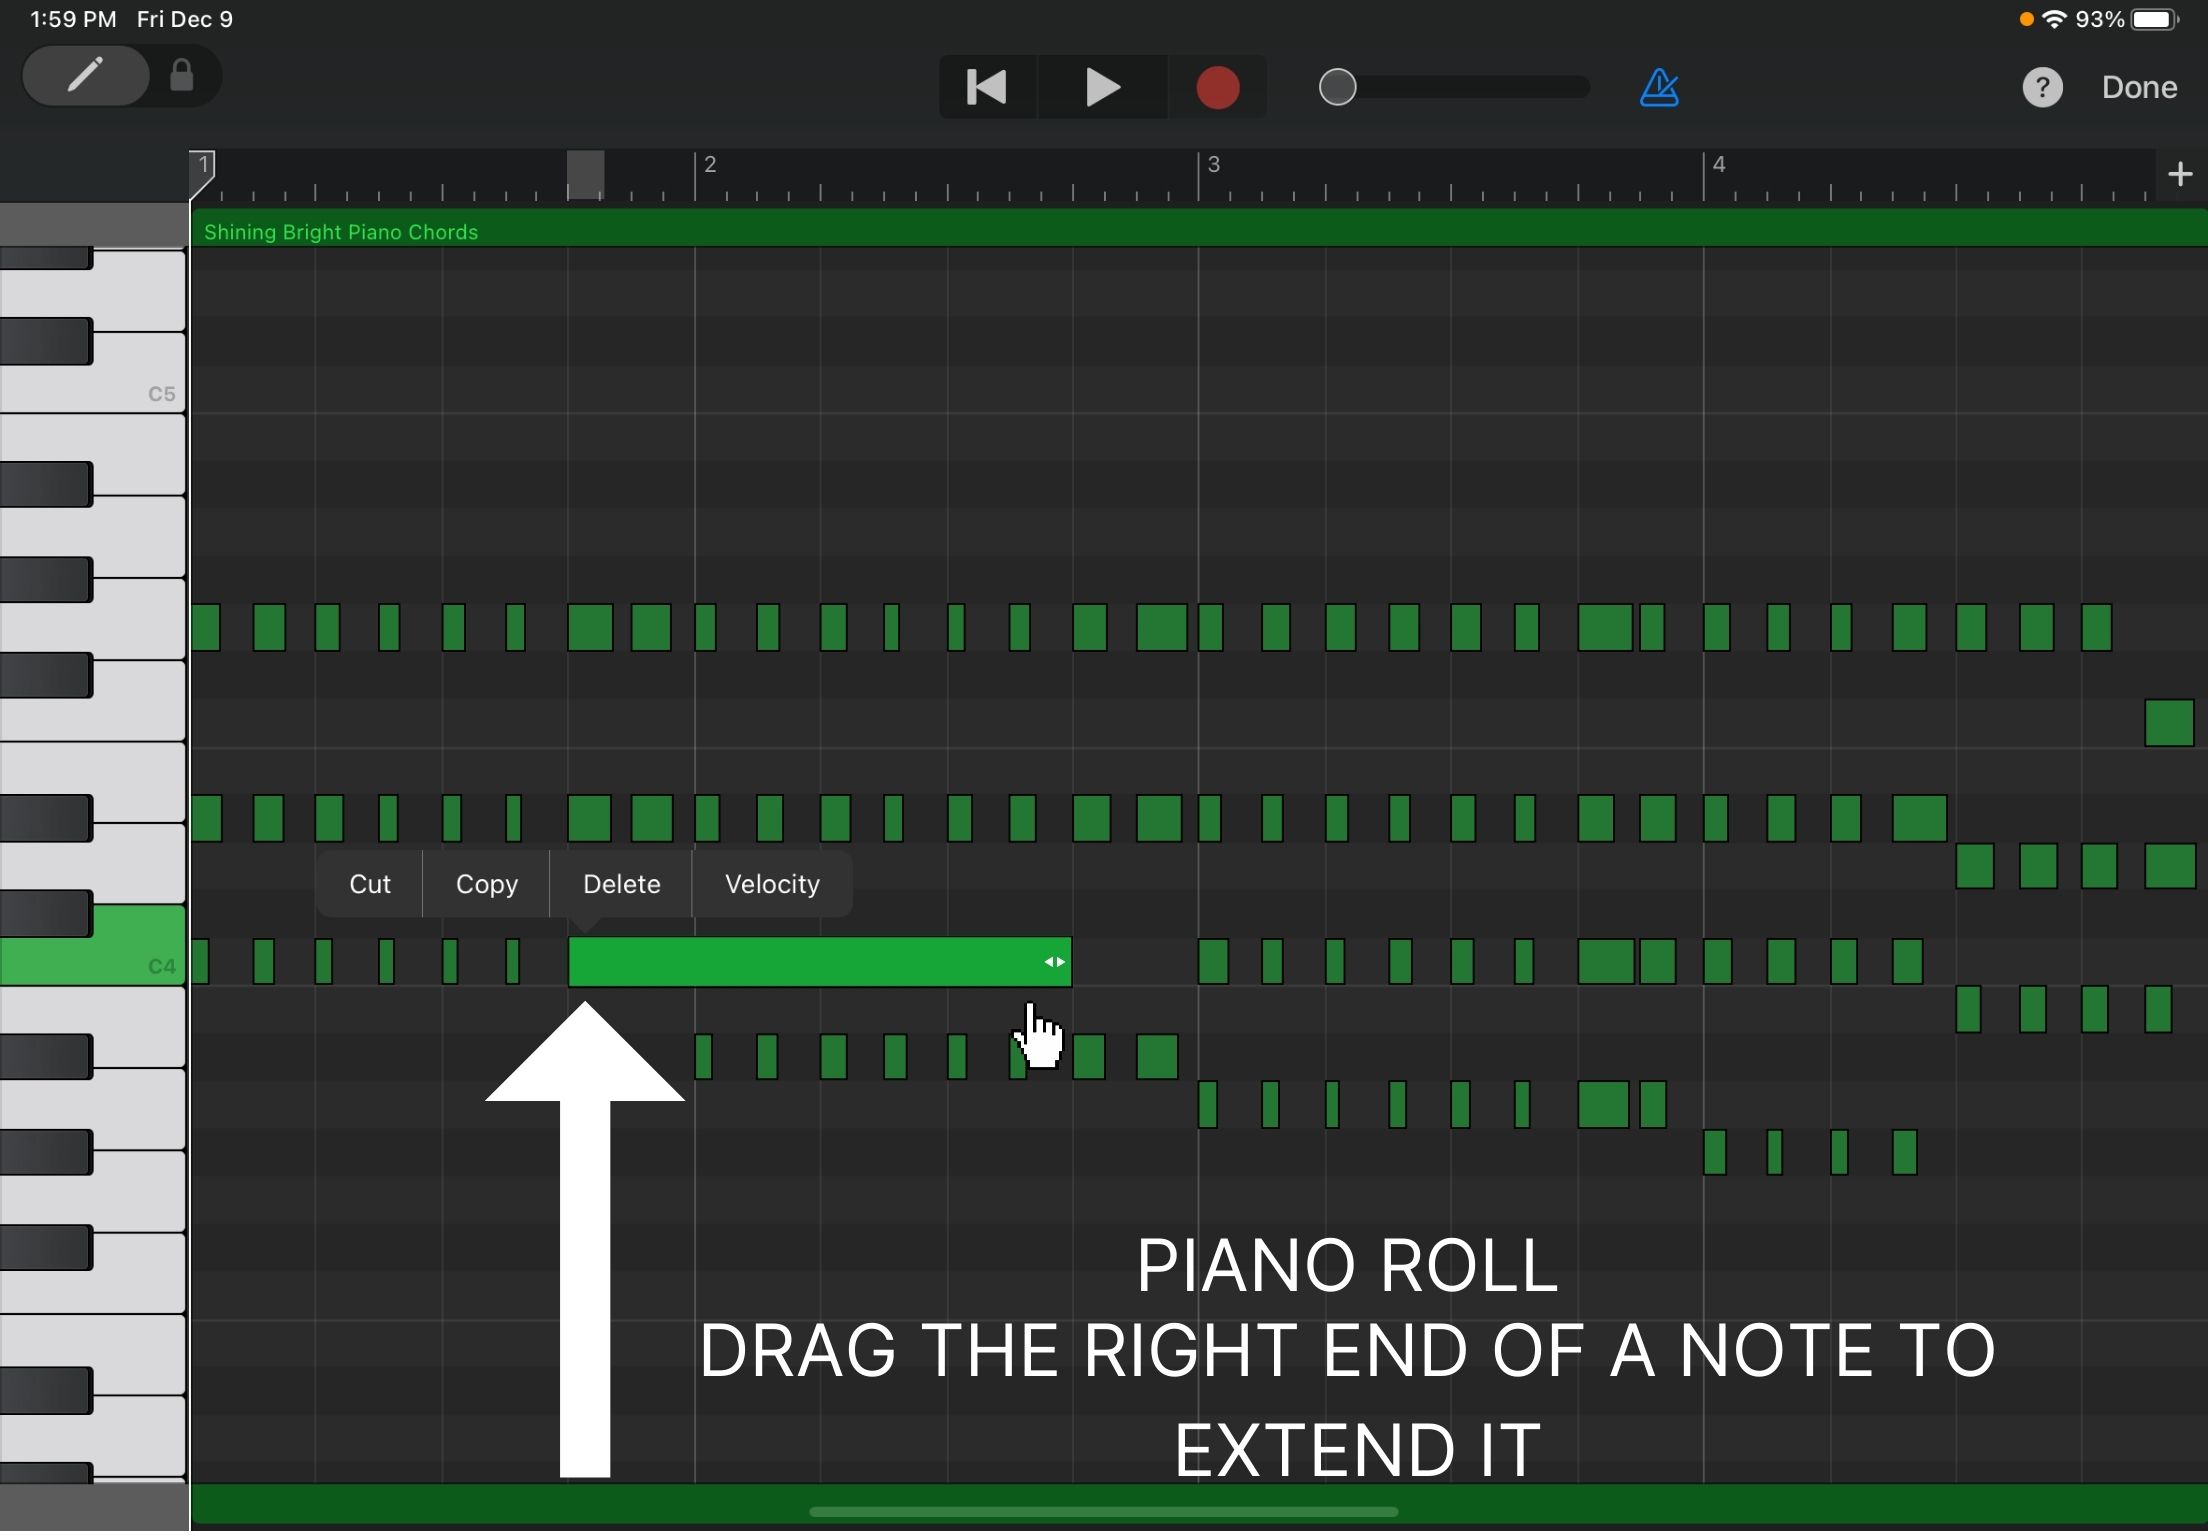
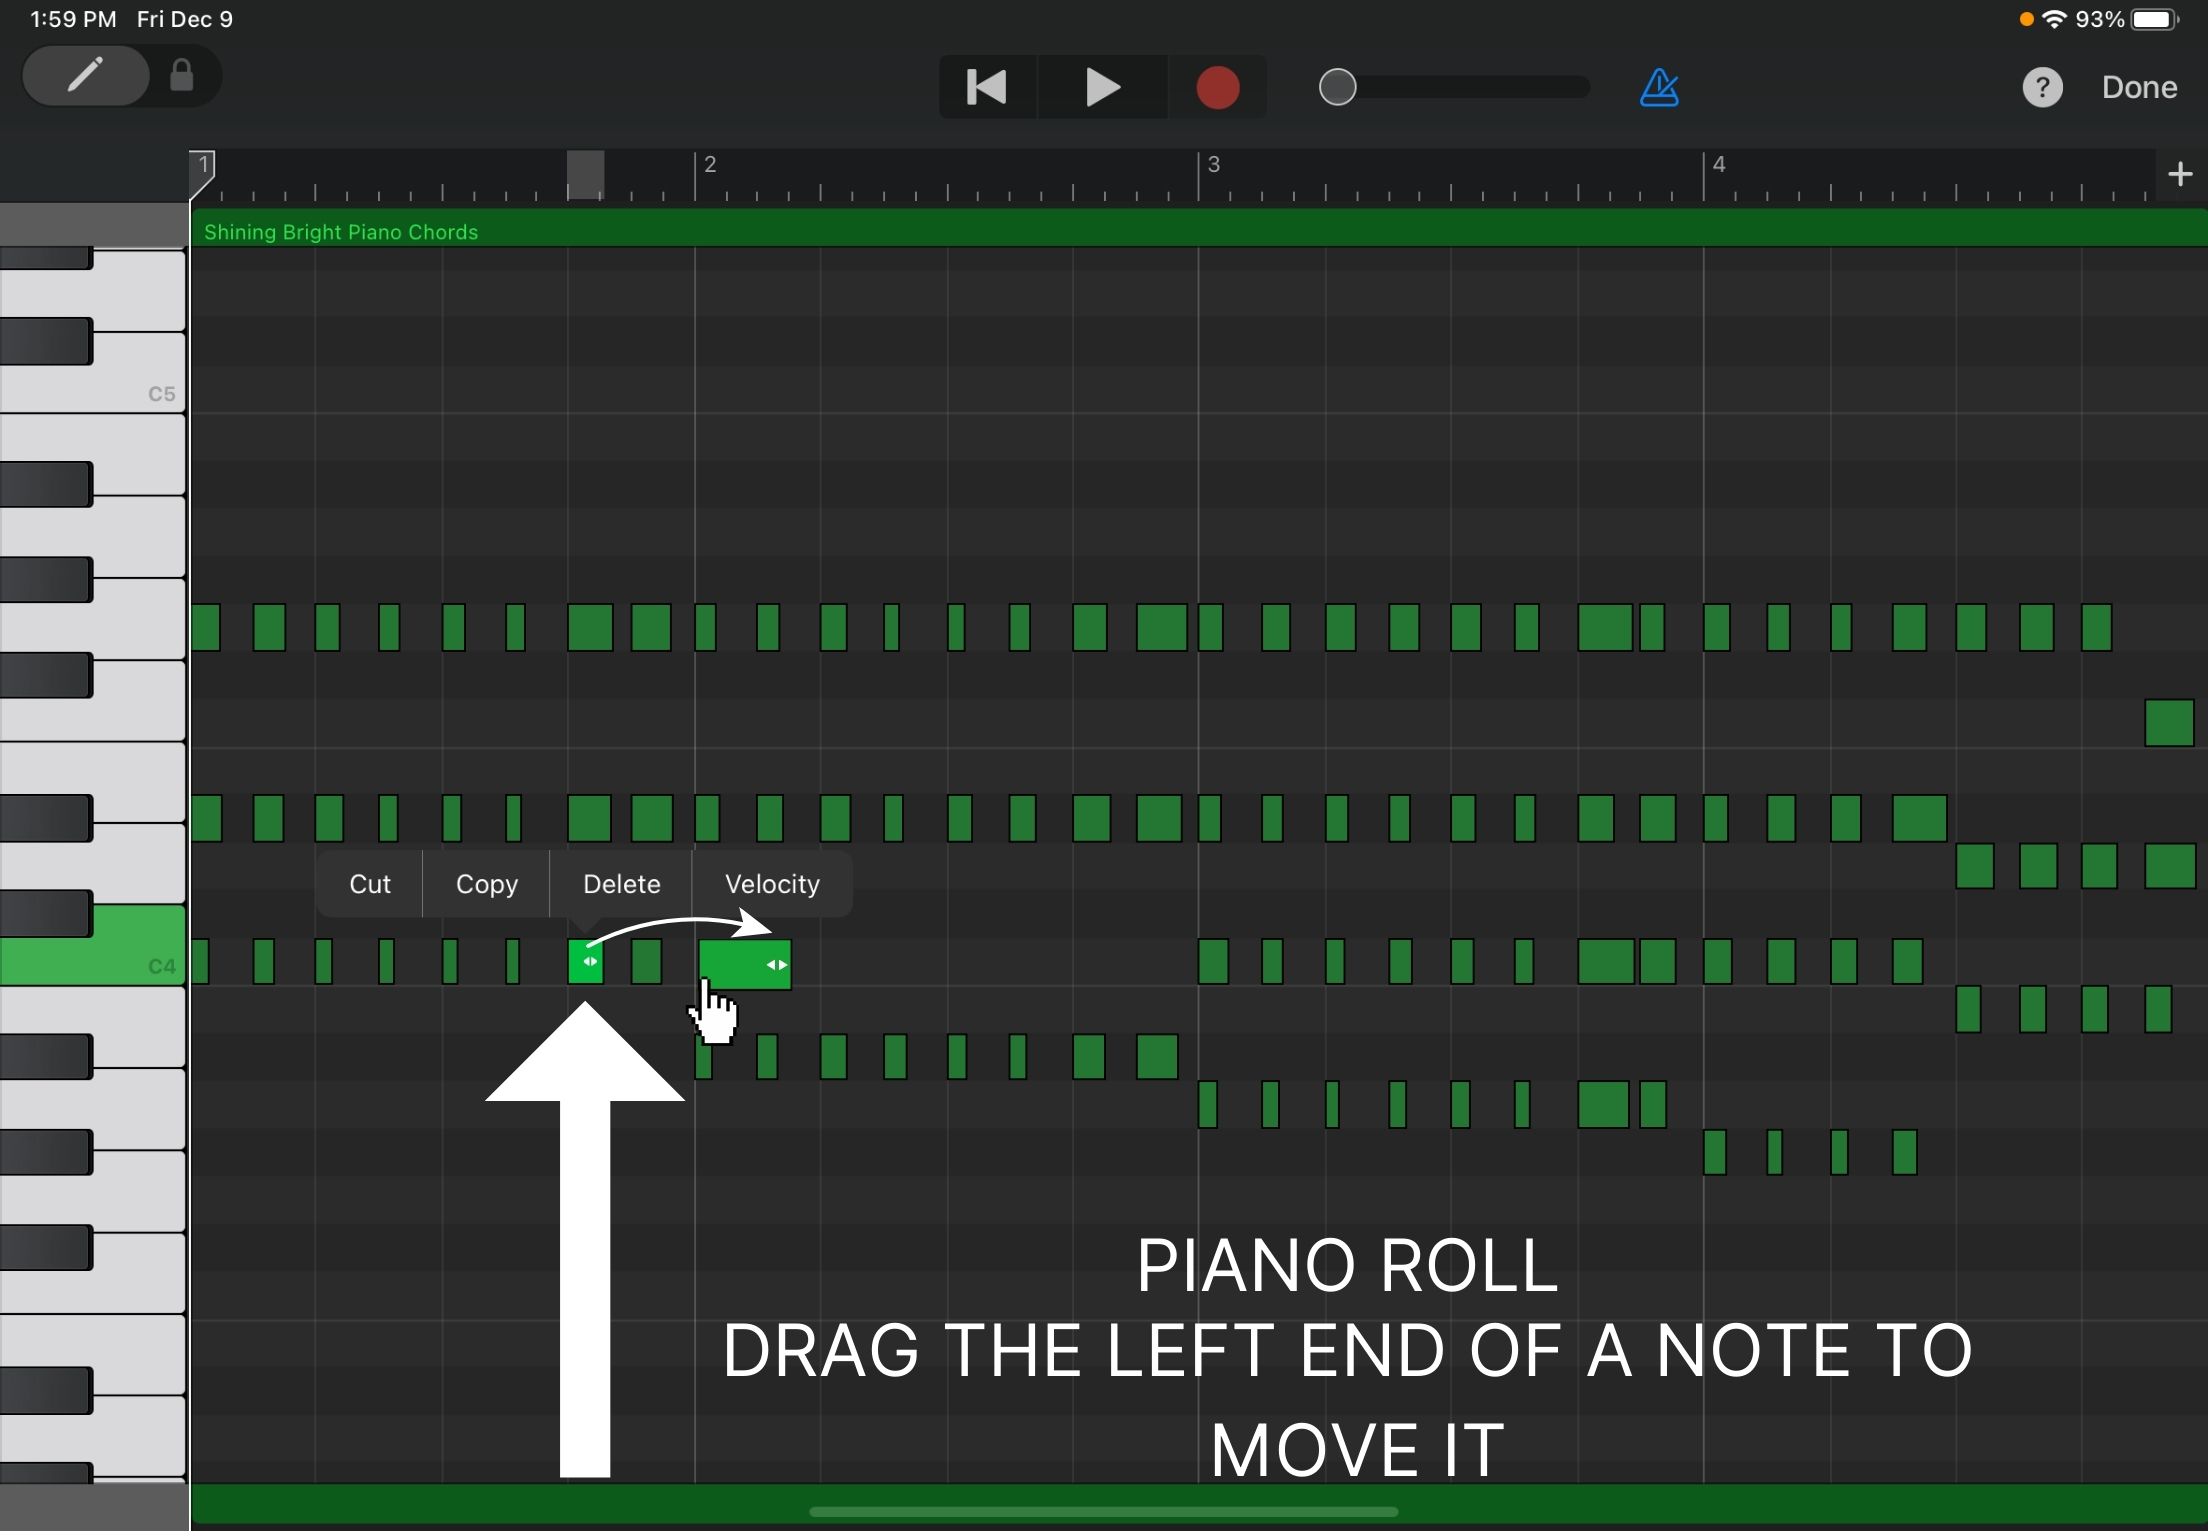
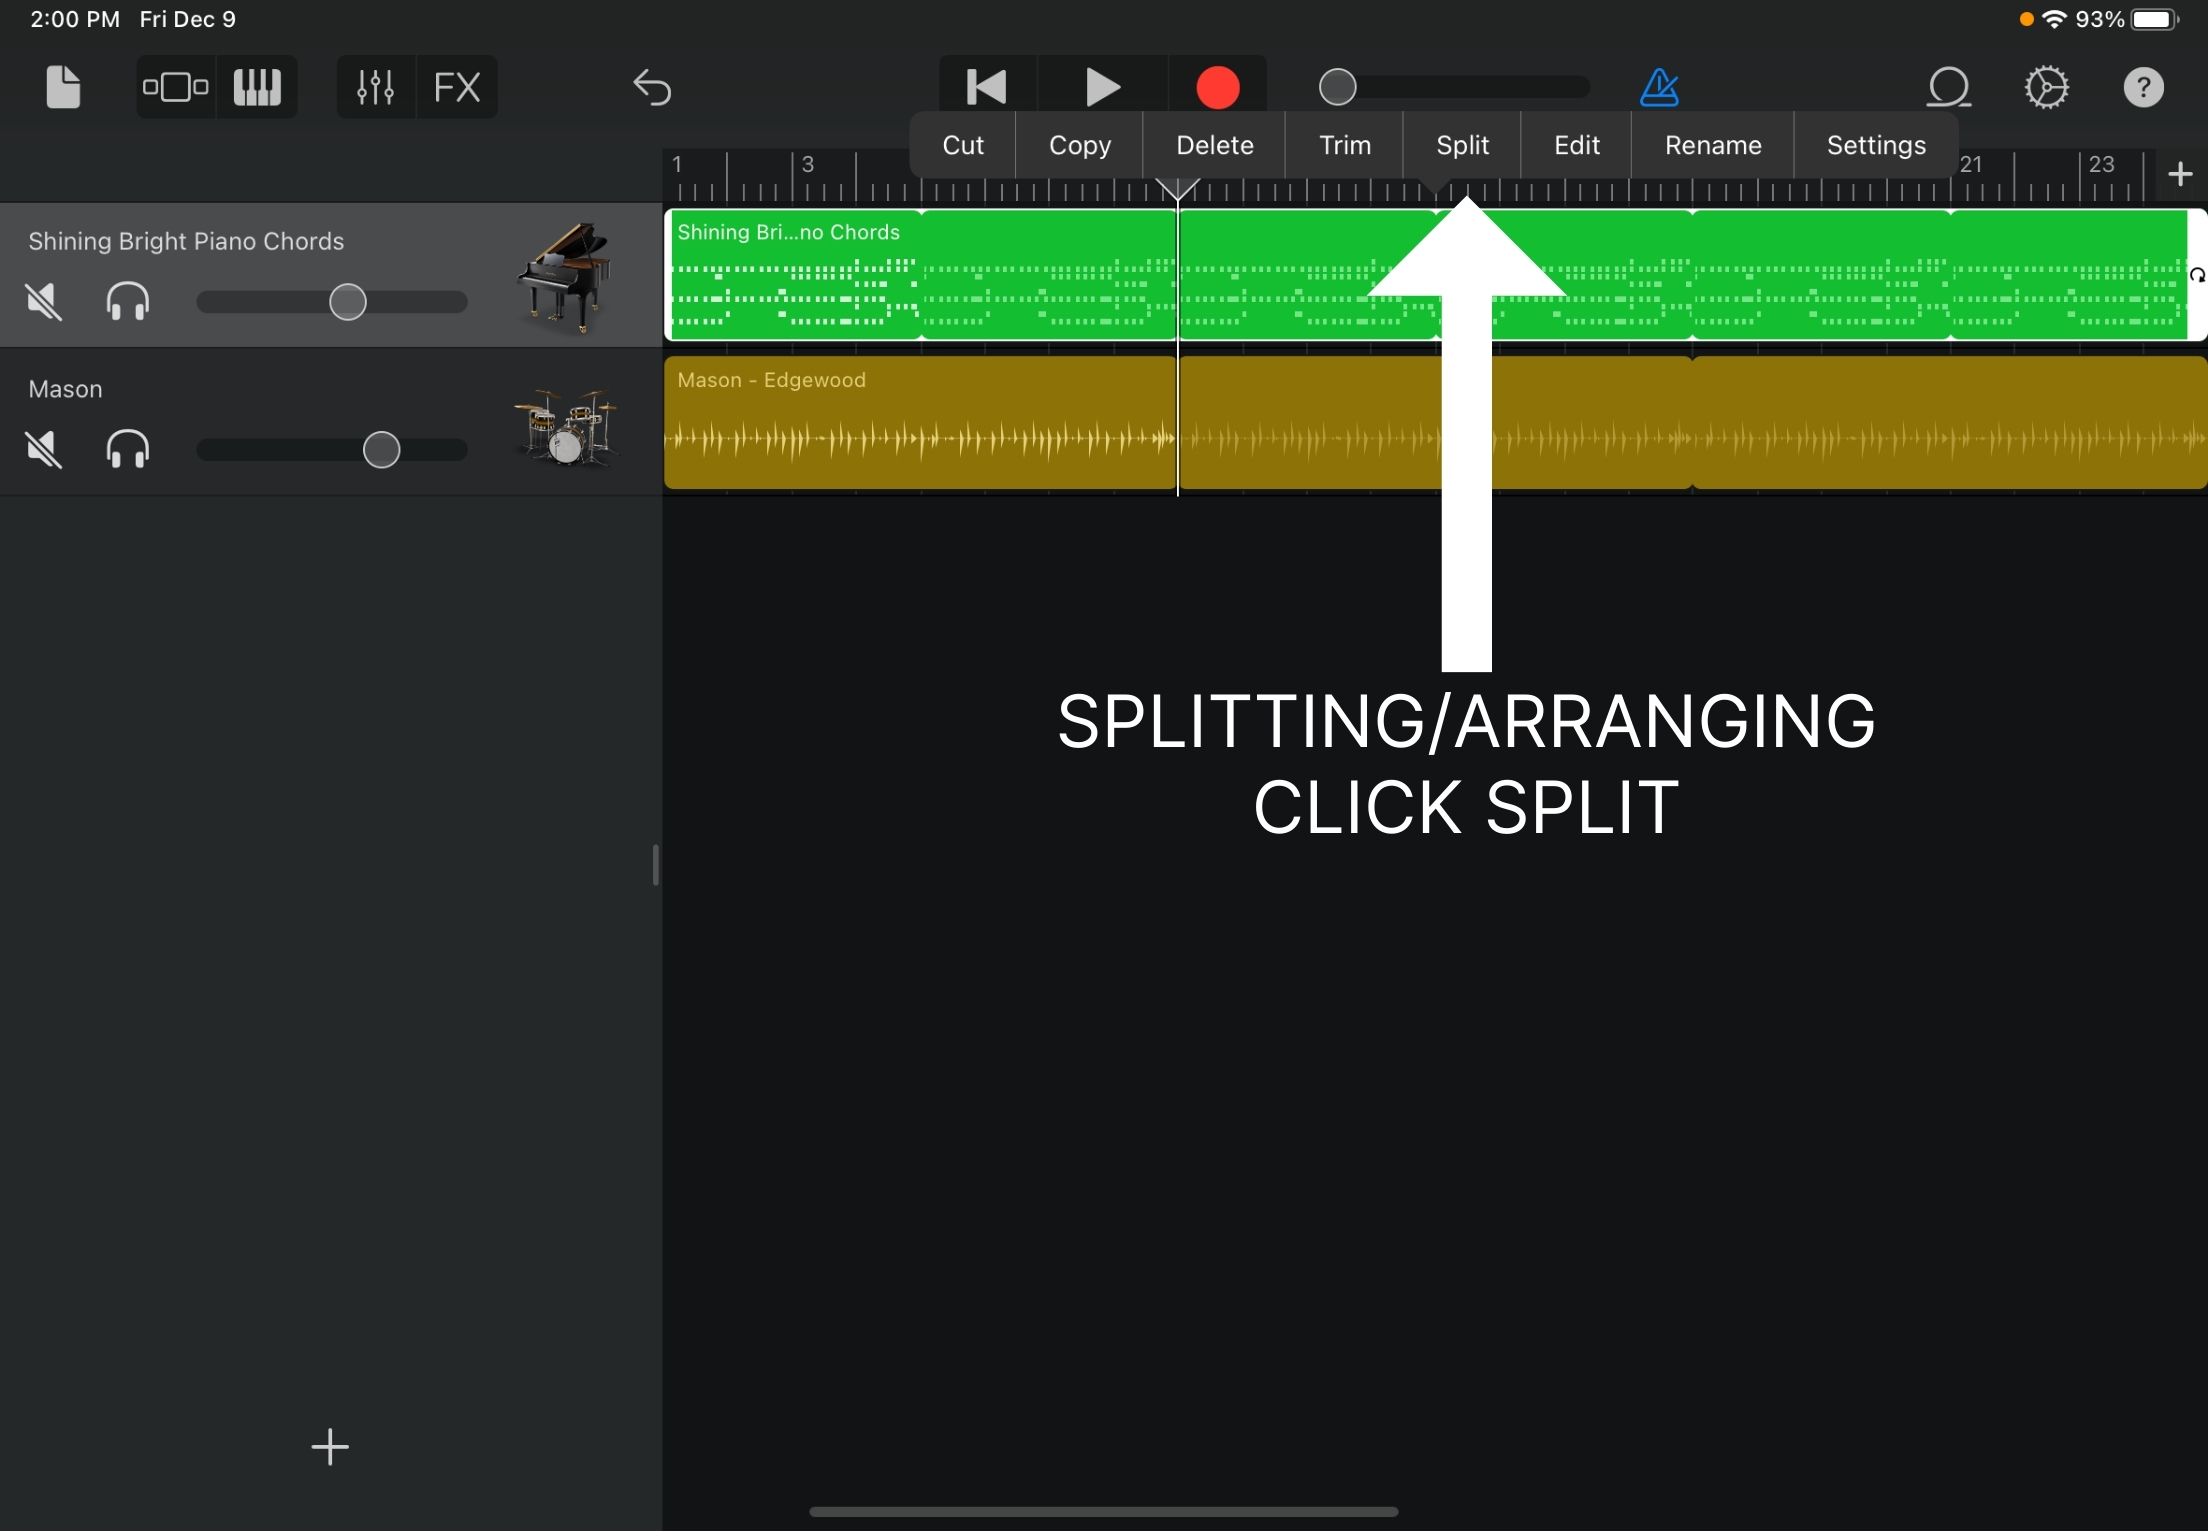
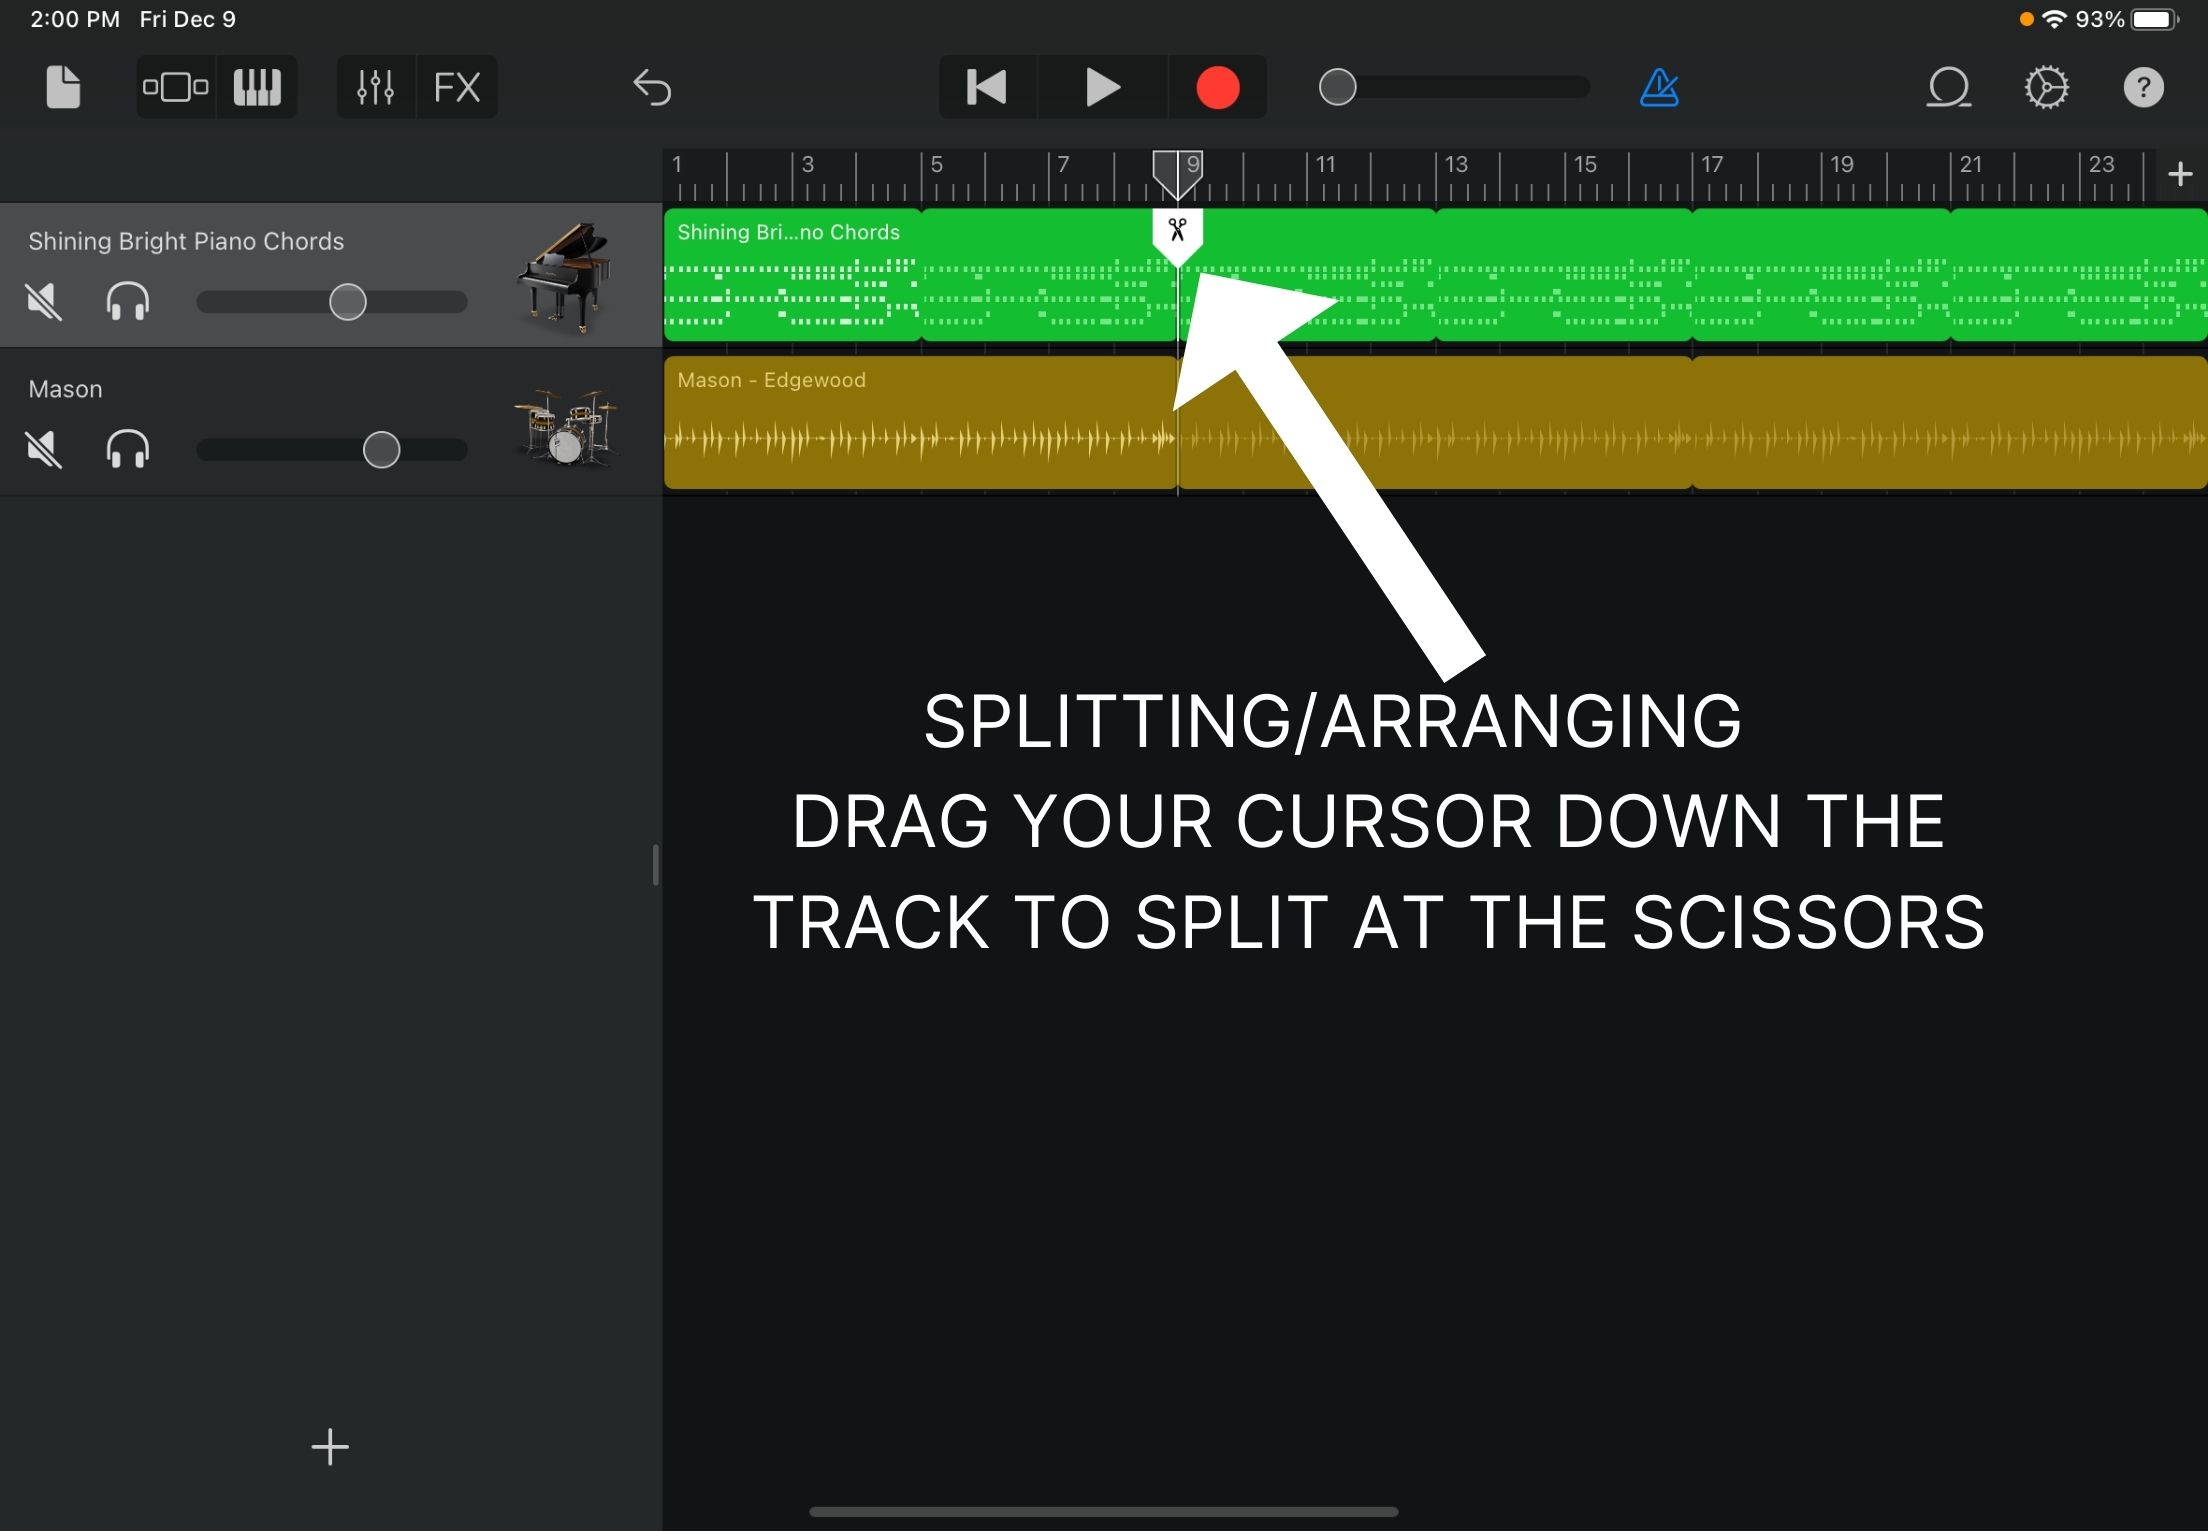
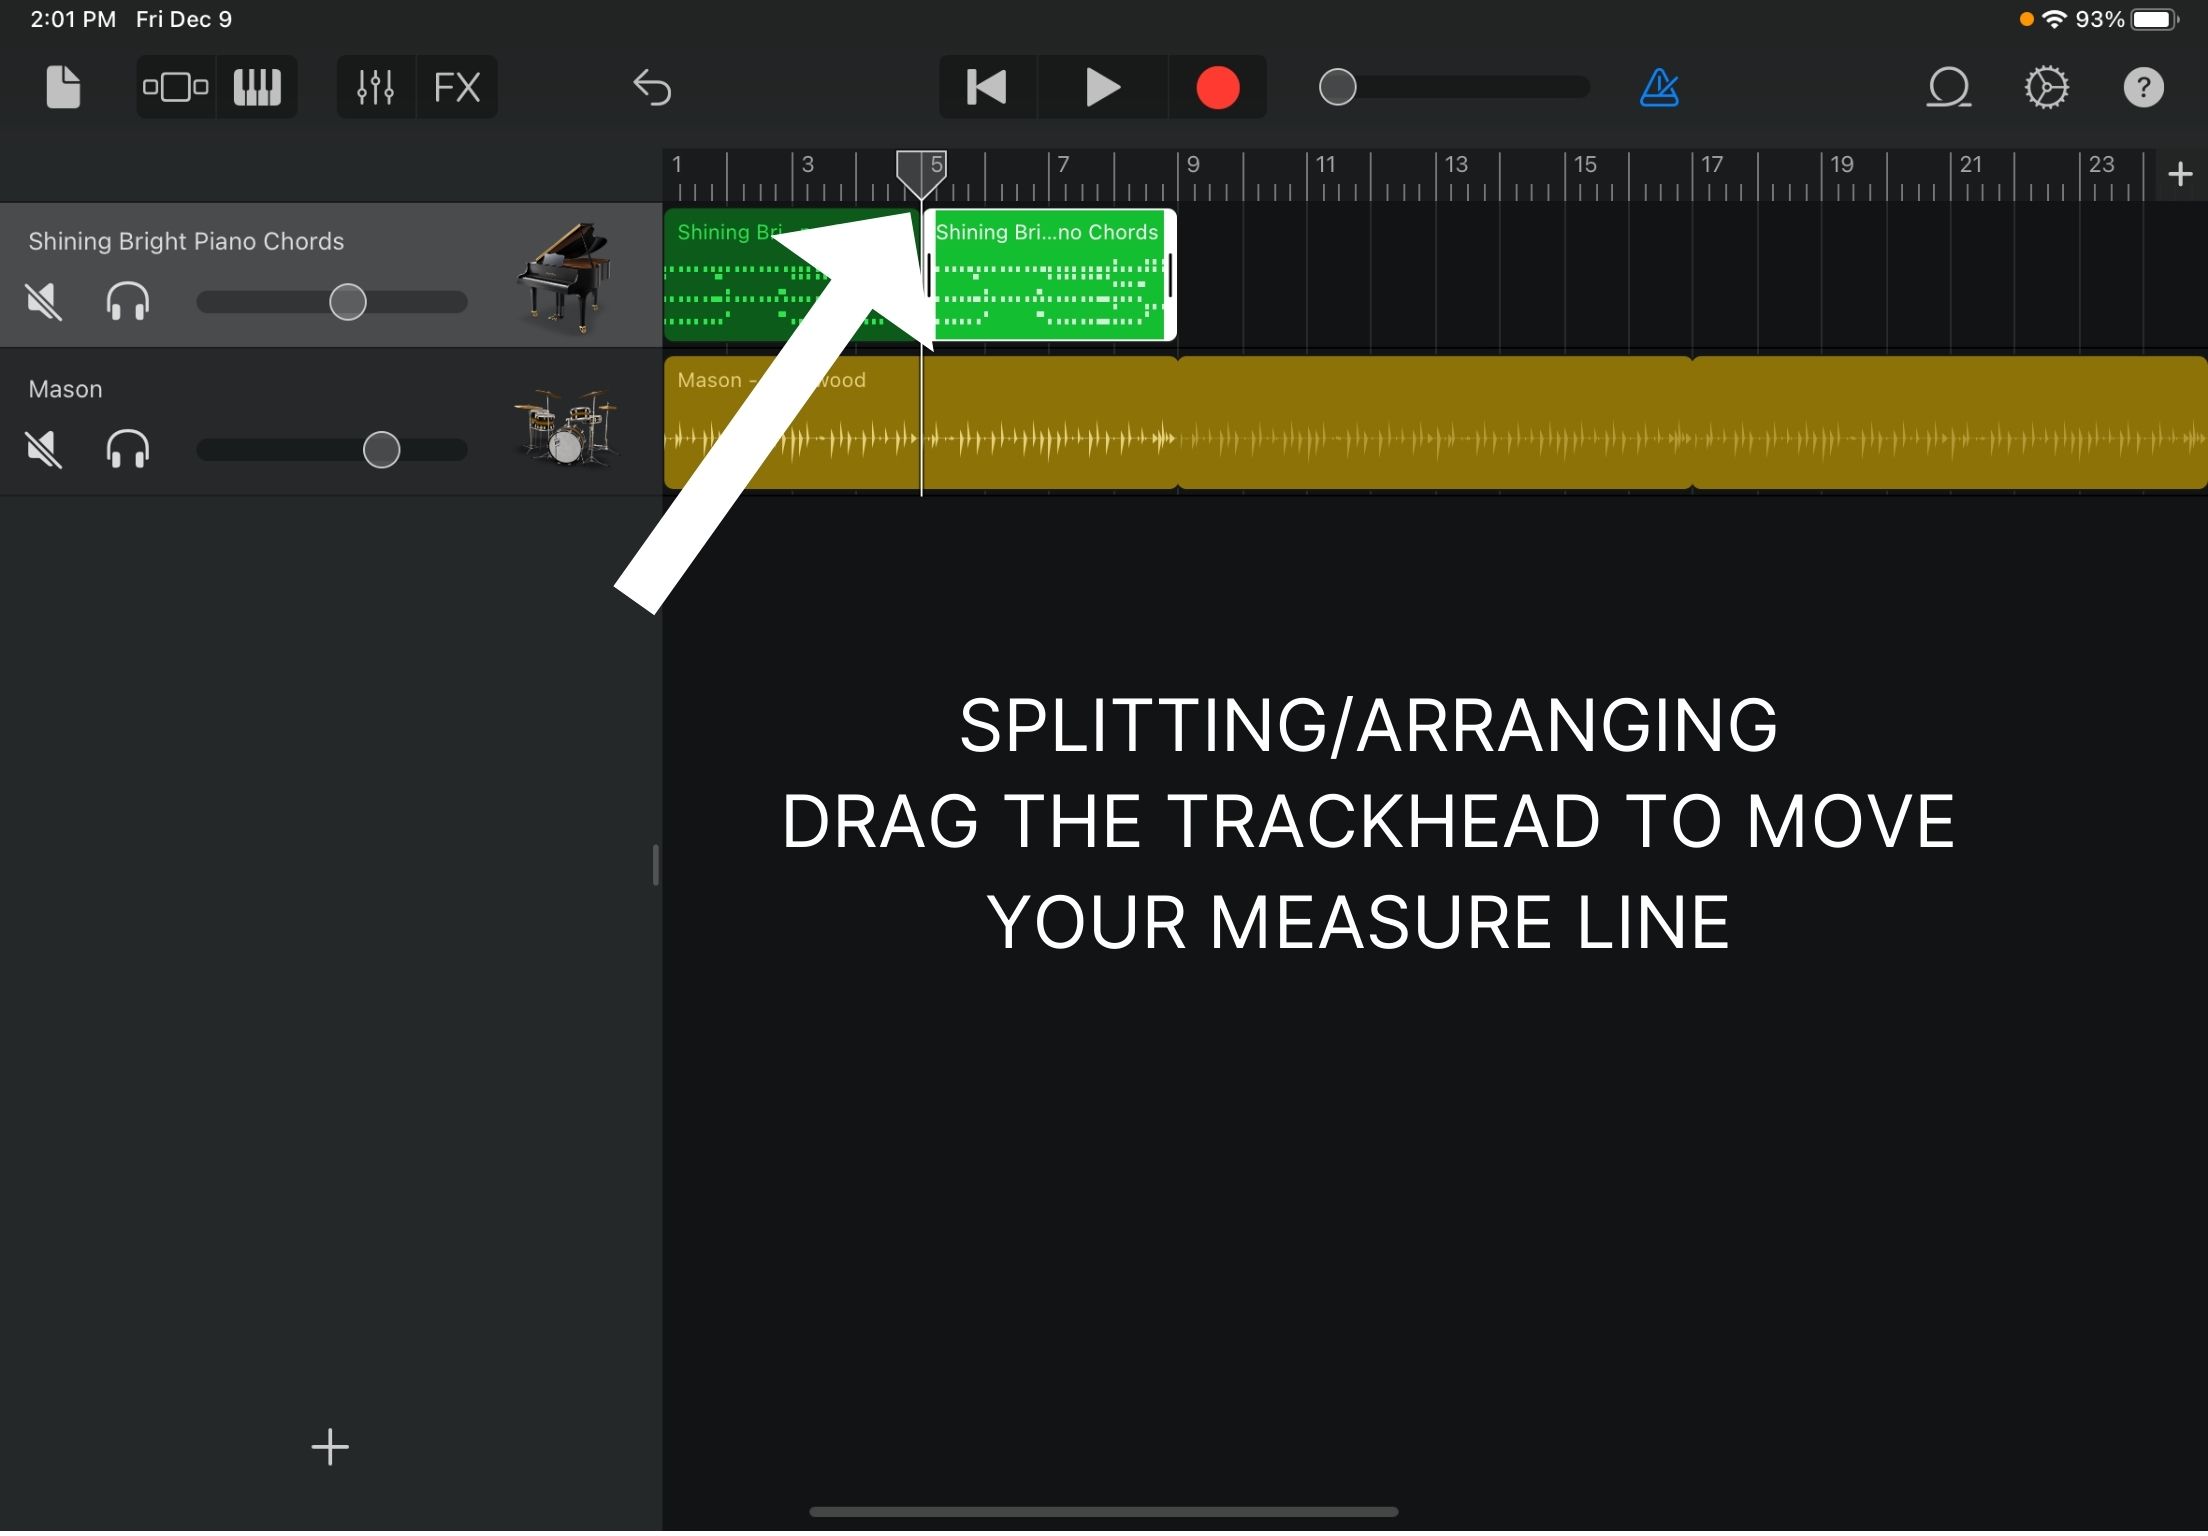
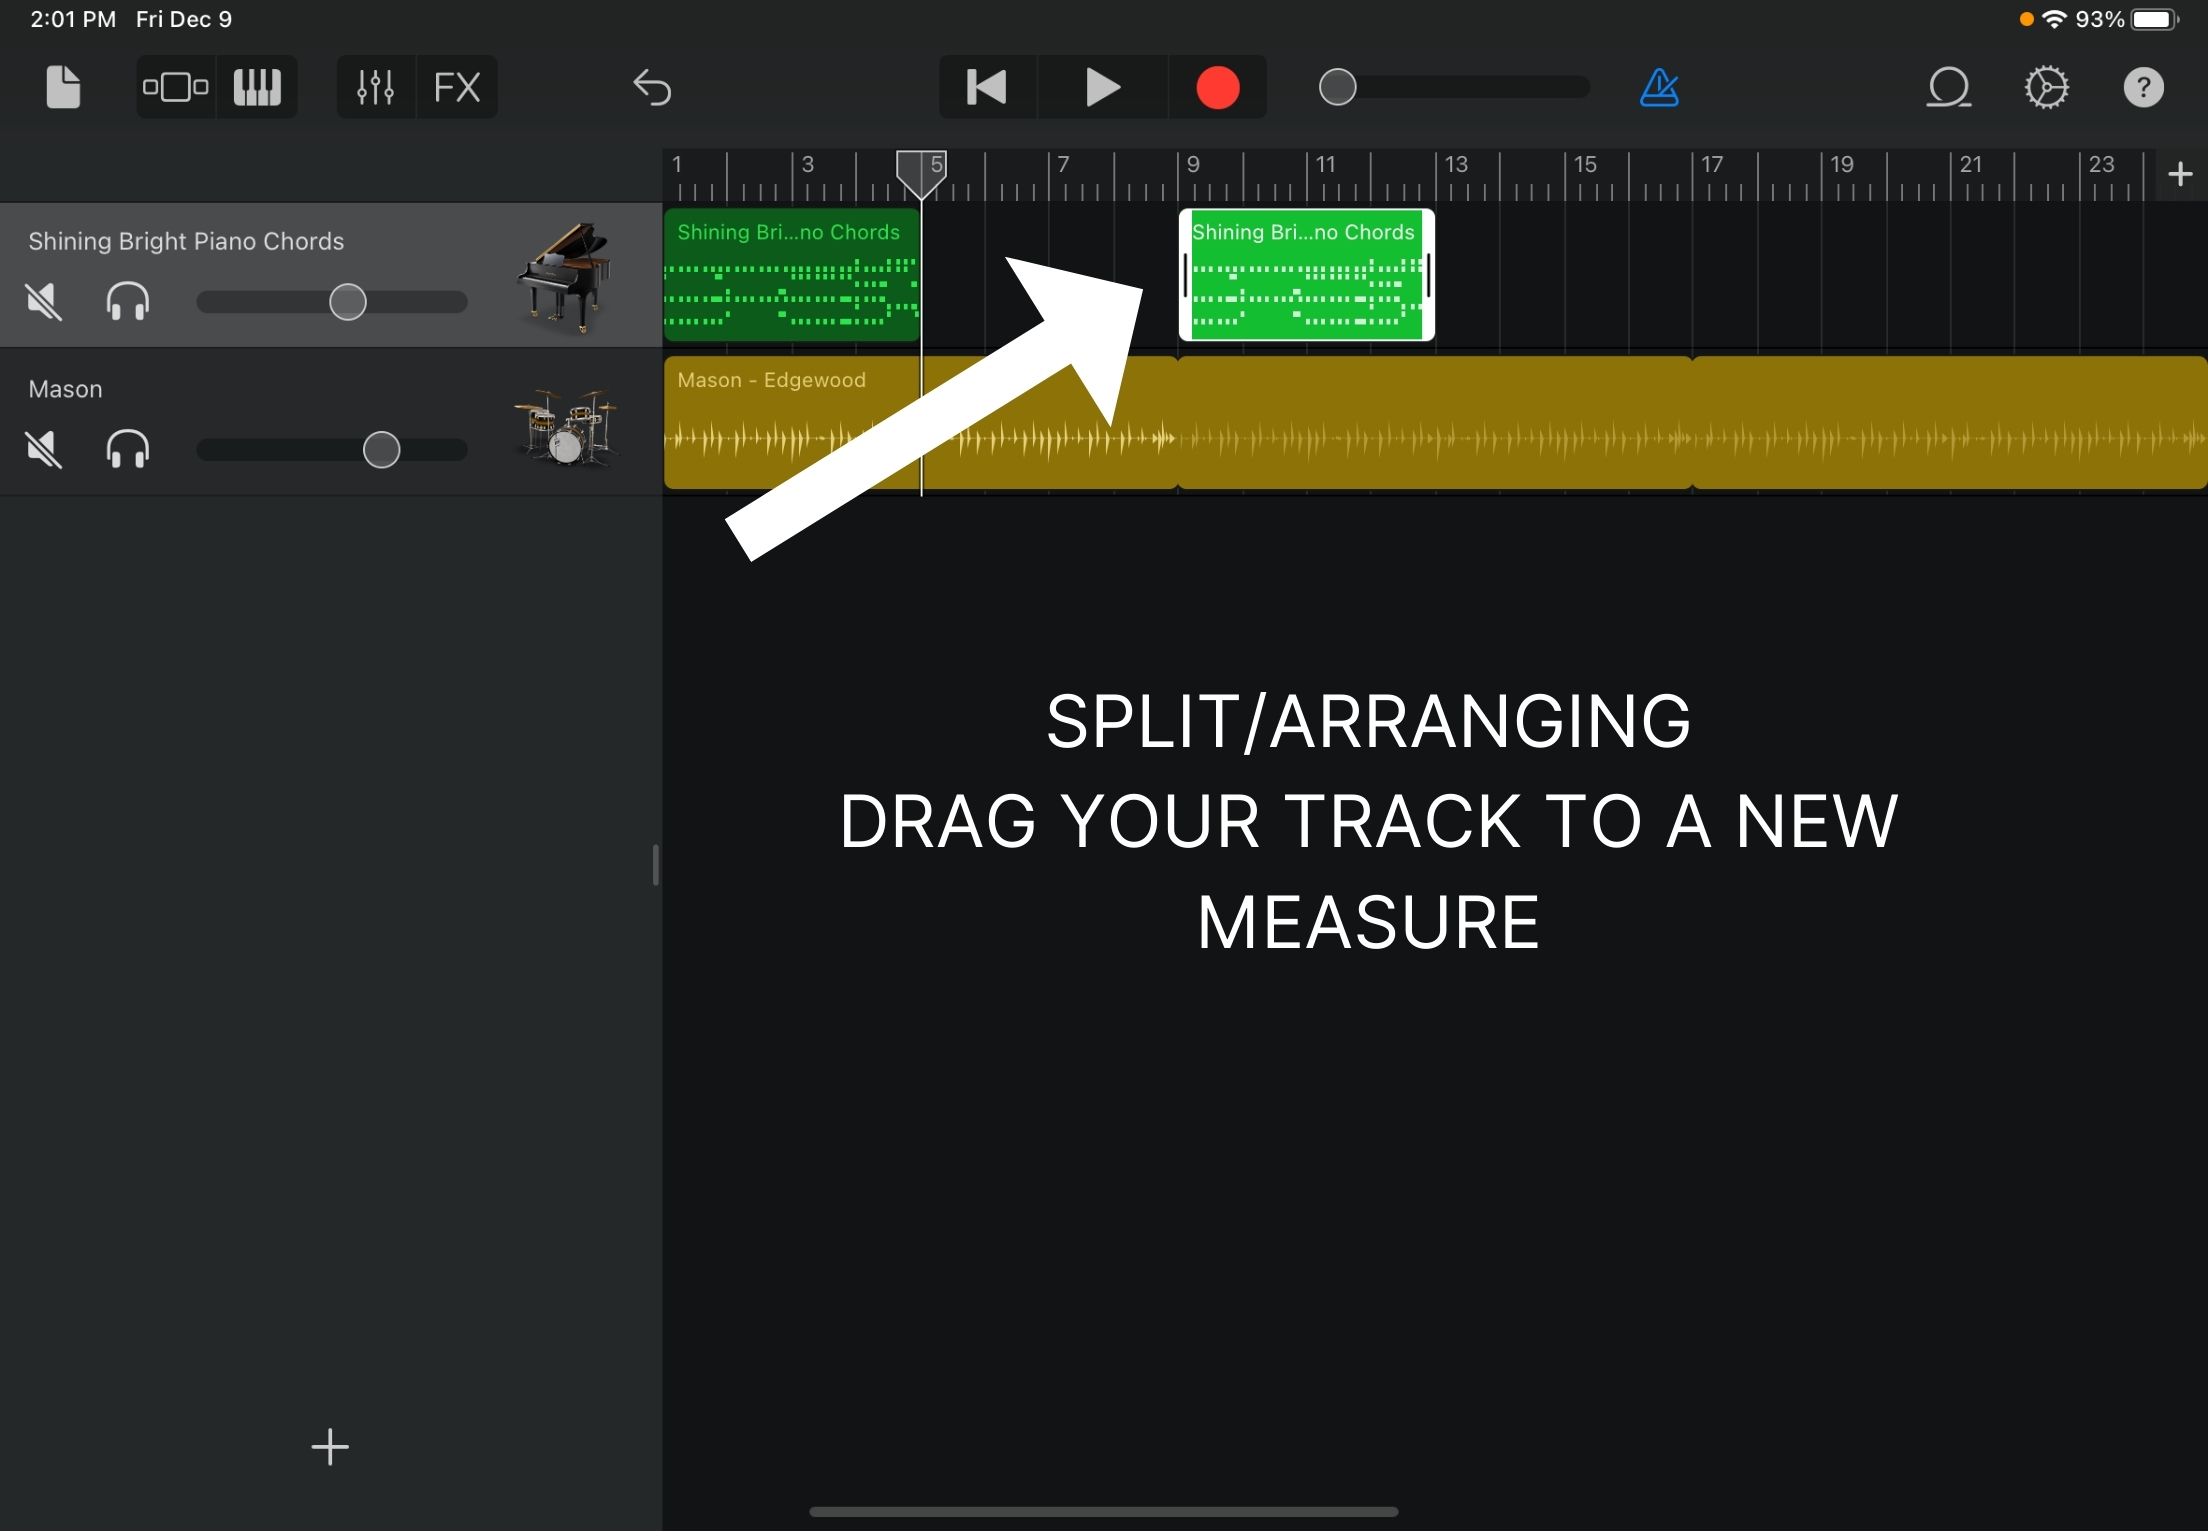
  3. Edit your MIDI track to your liking. Remember, you don’t have to start a track over if you hit the wrong note: double-tap or right-click the track, then select Edit to bring up the piano roll. You can change any note in the track by tapping or dragging it.
  4. Layer the tracks to hear how the melody and chord progression build on one another. You’ve just composed a multi-track sample of music on your own!

Want to see what this process looks like in action? Watch the video example below.

There are so many ways to get creative with MIDI instruments and mixing. You can use MIDI to imitate many different instruments and adjust every note just the way you want. Mixing, layering, and adding effects can completely transform your own tracks and pre-recorded loops. And MIDI instruments can make it easy to start playing chord progressions and composing your own songs. Whatever your taste or skill level, practicing with MIDI and mixing offers opportunities for fun, discovery, and the chance to start finding your sound your way.

Resources

to save your progress